
CAFA | Blog
We love to share images and stories about the beautiful garments that our students create, together with illustrated couture sewing techniques to help you level up your fitting and sewing.
Flexible Enrolment 〰️ Start Anytime 〰️
Flexible Enrolment 〰️ Start Anytime 〰️
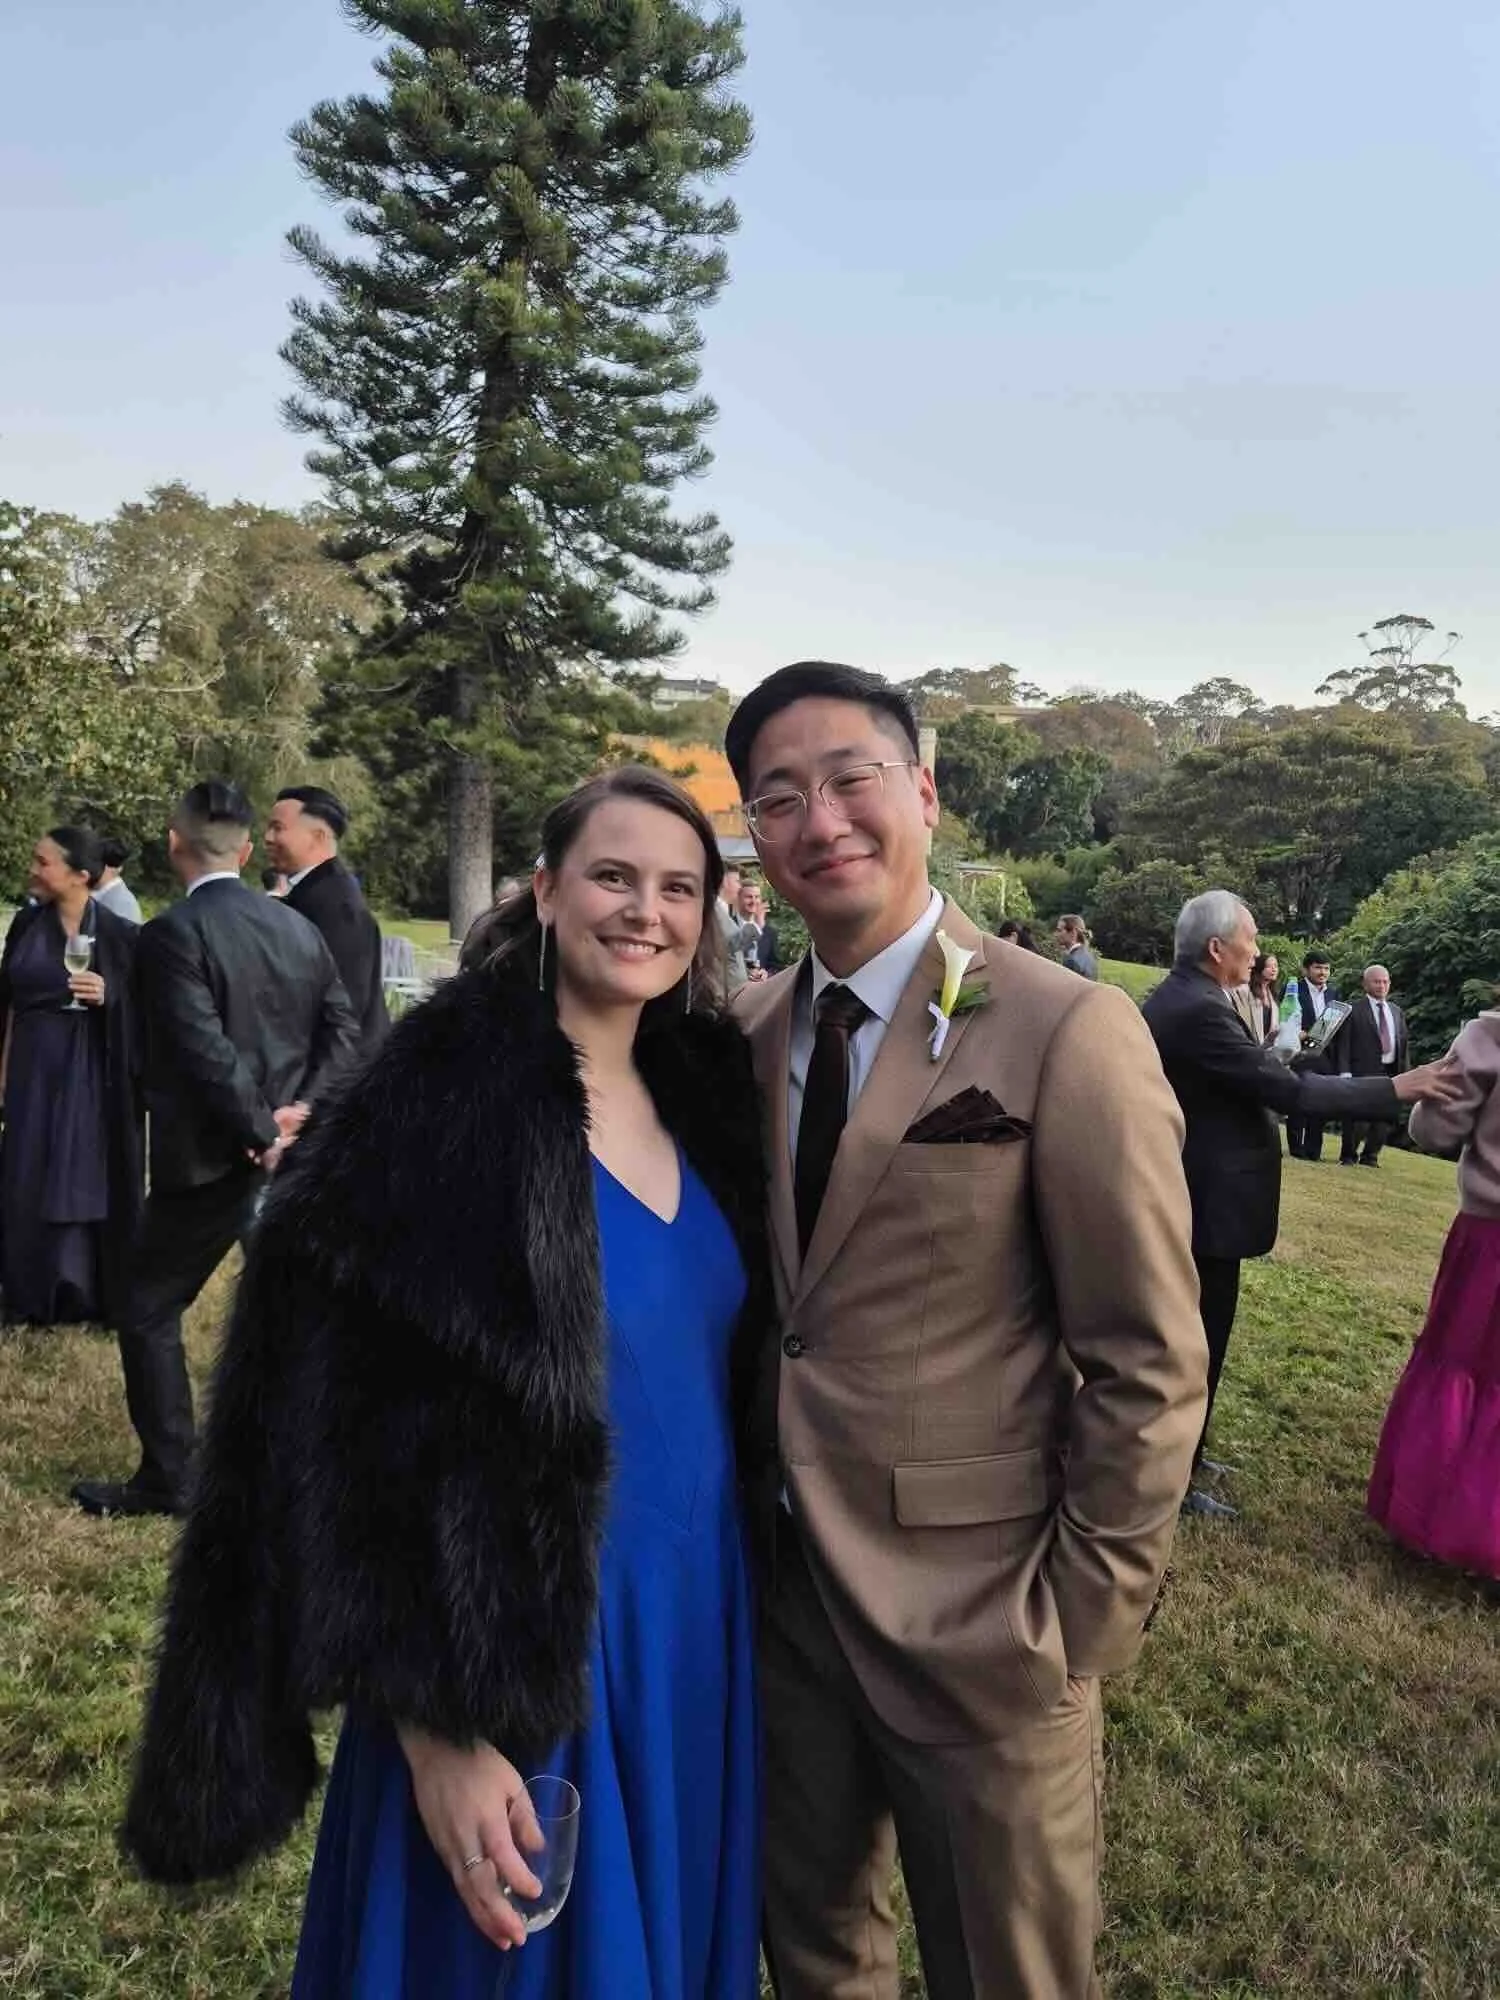
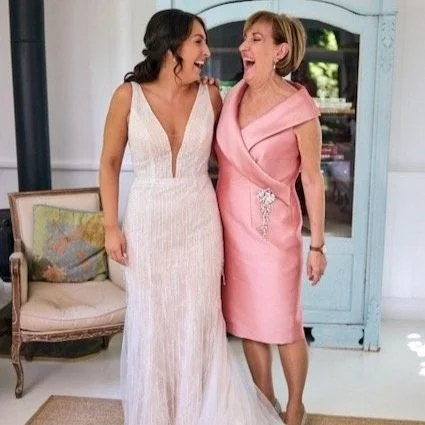
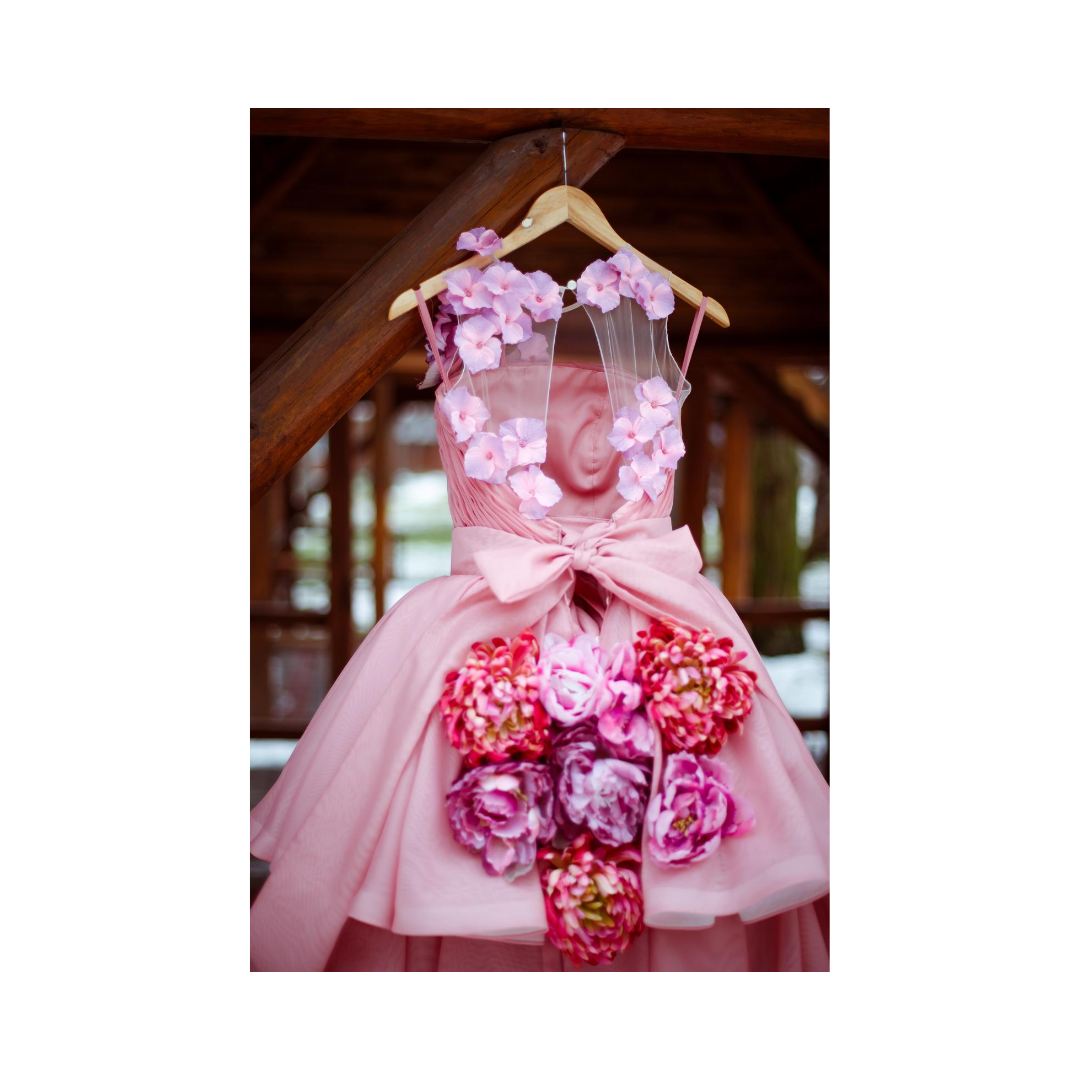
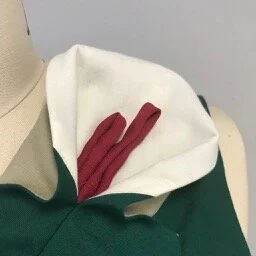
Meredith's Dress
VINTAGE INSPIRATION
Students this term have been treated to a step-by-step look at something truly special — a handmade wedding guest dress, crafted by our talented teacher, Meredith Paterson. The result? A stunning piece that blends skill, creativity and serious style.

That’s Meredith in blue in the middle with the groom’s sisters and cousins.
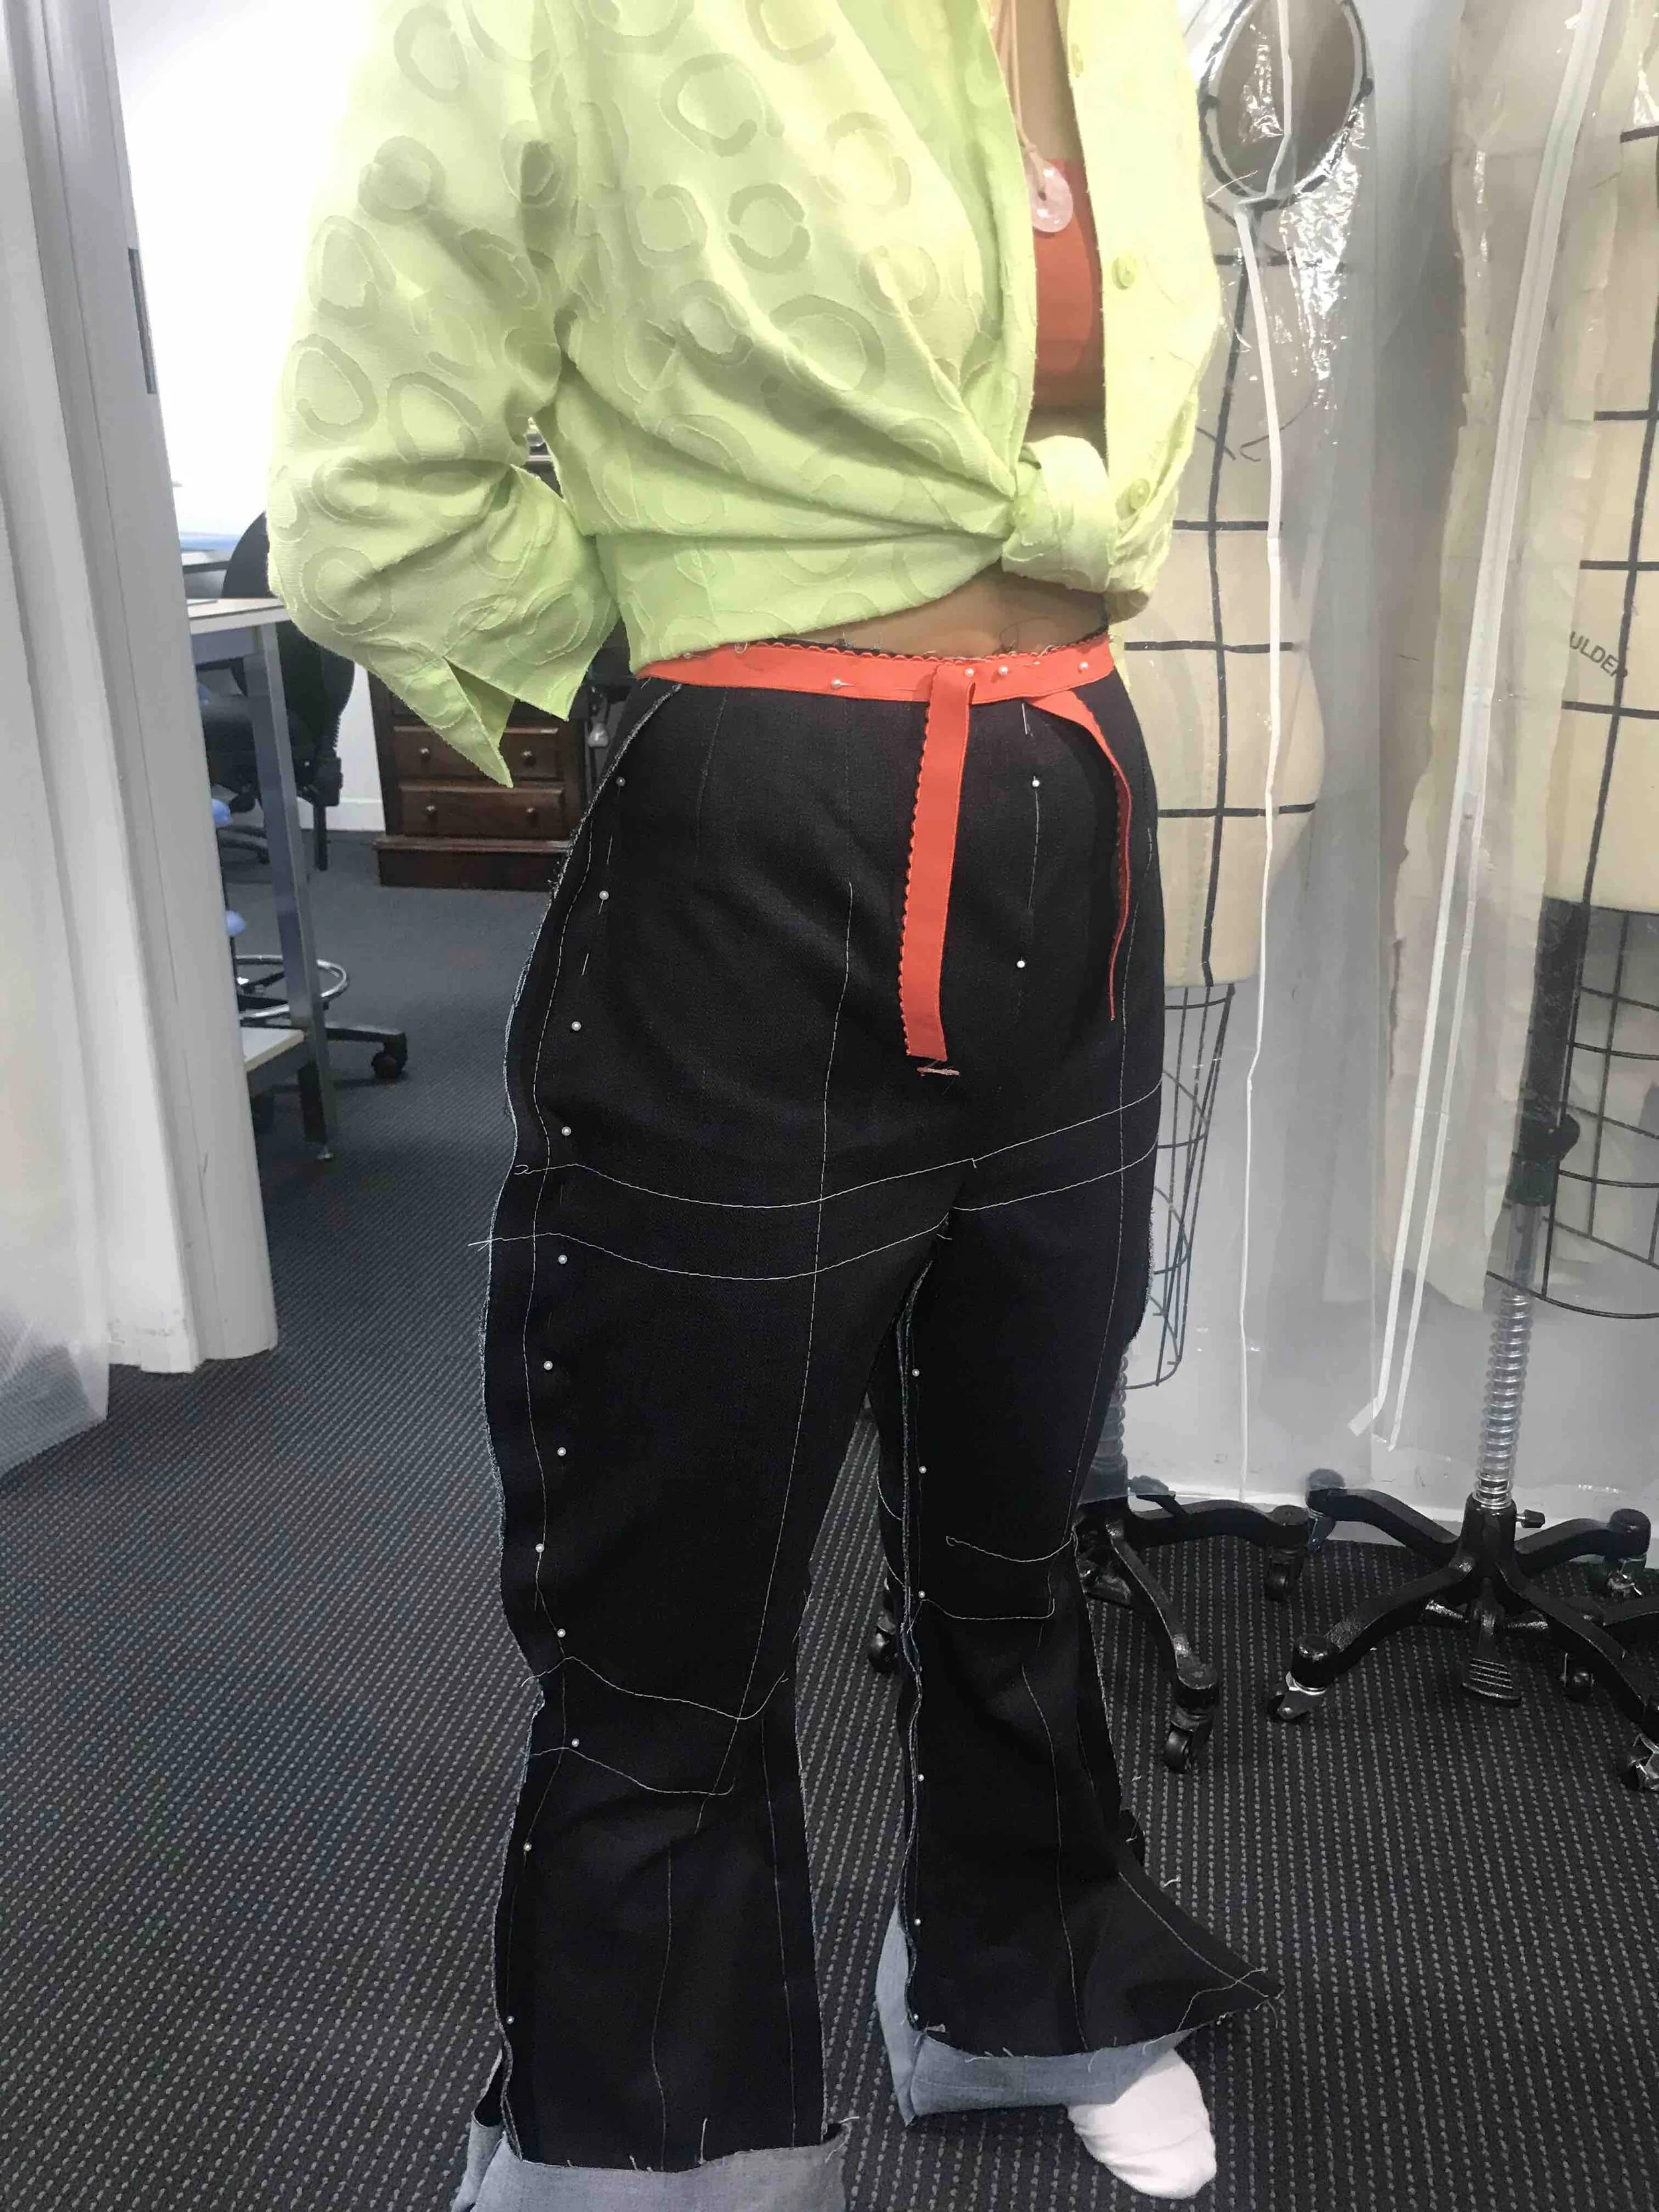
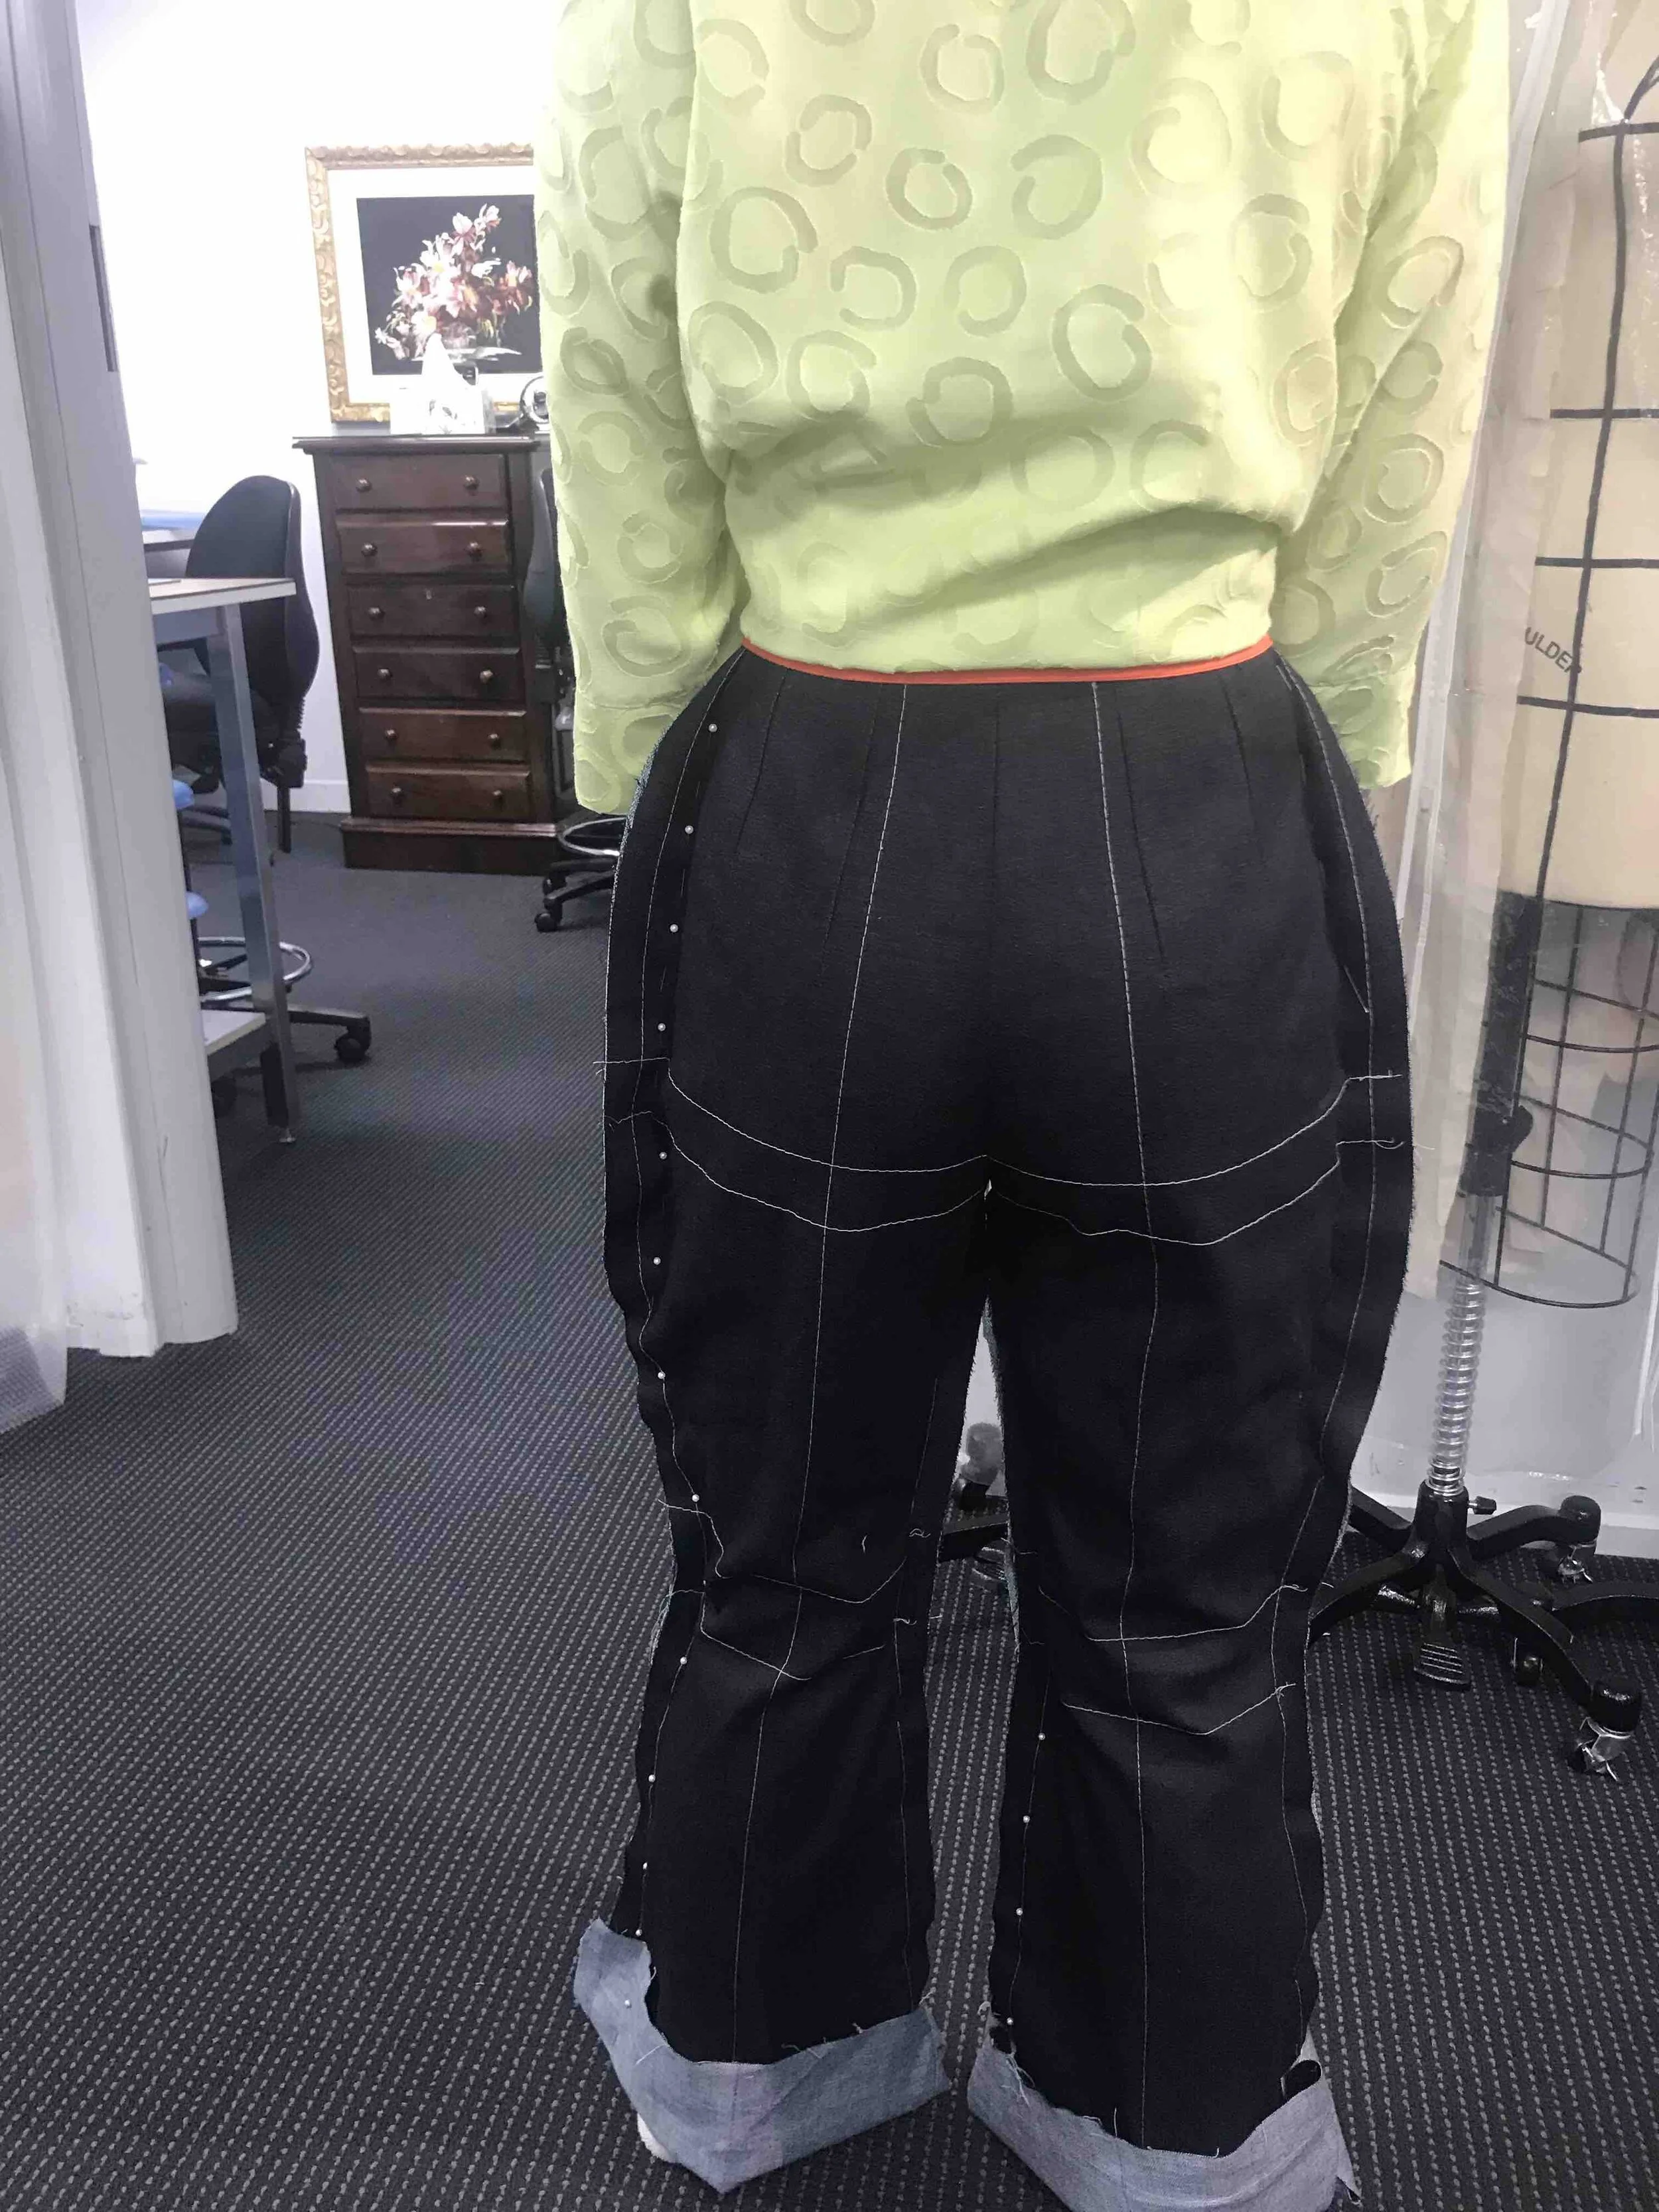
The dress was made with a royal blue 100% polyester satin-backed crepe from E&M Greenfields in Sydney, with the matte crepe side as the right side. It is totally bias cut, has a front and back V-neck, and princess lines coming to a point. It also has boning, an invisible zipper, and 7 godets (lots of hem!). Meredith drafted this pattern from her bodice block, and made four samples to get the fit just right.

Here’s Meredith with her partner Kenny (brother of the groom).
The pictures speak for themselves. Meredith’s dress is a perfect fit!

Meredith with Kenny’s sister, Athena.
If you’re tempted to enrol in a class and make something truly amazing for a special occasion, there are a couple of few different options on offer:
Sew Wool Like a Pro
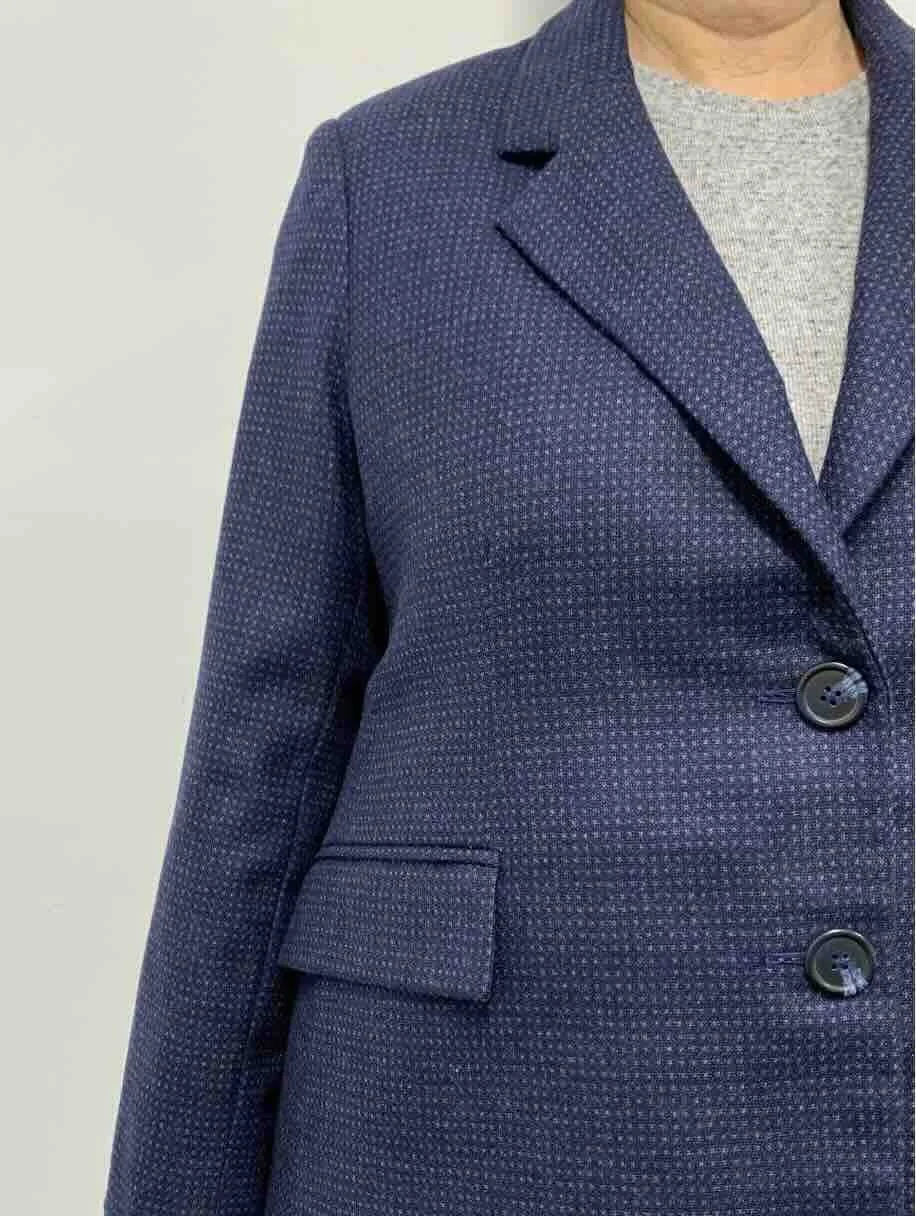
Wool is one of our favourite fabrics to sew and wear. It’s soft yet structured, warm but breathable — and it absorbs moisture without feeling damp, keeping you comfortable no matter what the season.
We’ve rounded up our top tips for sewing with wool.
Boiled Wool: Beginner-Friendly and Fuss-Free
If you’re new to sewing wool, boiled wool is one of the easiest and most satisfying fabrics to start with. It’s thick, stable, and naturally felted — which means it won’t fray and doesn’t need seam finishing or lining. It’s a great choice if you want to sew something warm and wearable — fast. It’s also a great option for confident beginners who want a polished look wihout a lot of fuss. Boiled wool is perfect for:
Simple jackets, cardigans, wraps and unlined coats
Raw-edge designs with minimal construction.
You’ll find a gorgeous range of colours, weights, and patterns from our friends at Tessuti Fabrics, including some fabulous jacket and coat patterns designed especially for boiled wool.

This beautifully fitted and sewn jacket is perfectly suited to a mid-weight wool fabric
2. Don’t Skip the Pre-Shrink!
Wool fabrics have a soul of their own when it comes to heat and moisture - a feature that tailors us to shape garments to the body of the wearer. Like all natural fibre fabrics, wool crepe and wool jersey are especially prone to shrinkage, so it’s always worth prepping your fabric (before you cut it) with one of these methods:
Option 1: Steam Shrink
Lay your fabric flat and use a steam iron with a press cloth, hovering just above the surface (don’t press down). Let the steam do the work, then allow the fabric to rest and cool.
Option 2: Damp Towel Method
Place your wool fabric between two clean damp towels, roll it up and leave it for a few hours, then lay it flat to dry.
Option 3: Dry Cleaner’s Steam Press
If you’re working with a precious or expensive piece, take it to the professionals and ask for a pre-shrink steam treatment.

Pre-shrinking not only prevents unexpected size changes after sewing — it also relaxes the fibres, making your fabric easier to cut and sew accurately.
3. Sewing Bulky Wool Fabrics
When you’re sewing with thick or coating-weight wools, sewing through multiple layers — such as facings, collars or lapels — there are a couple of essential techniques that will save your sanity (and your garment).
On many (most modern) sewing machines, it’s possible to adjust the presser foot pressure. At the same time, lengthening your stitch will help bulky fabrics feed more smoothly, preventing the layers from shifting or bunching. A walking foot (which are available for many machine models) achieves the same result mechanically, moving the top fabric in sync with the feed dogs below. We have these in our studio - if you’re enrolled in a class, do check them out!

The fabric used for this jacket needed some sewing machine adjustments and stitch length changes to ensure smooth seams were achieved.
4. Skip the Fusible Interfacting and Consider Underlining Instead
When sewing with textured or delicate wool fabrics like bouclé or wool crepe, it's best to avoid fusible interfacing. The heat and adhesive can change the feel of the fabric, flatten texture, bubble or shift — especially on looser weaves. Instead, consider underlining — a couture-friendly technique where a second layer of fabric is cut to match your garment pieces, basted to the wrong side before construction. Choose a lightweight silk organza, cotton voile, or fine wool batiste — something breathable but stable.
Why underlining works:
It adds structure and some stiffness while preserving the look and feel of the outer wool fabric
Helps stabilise seams and reduce the distortion that can happen with open weave novelty fabrics and/or heavy trims and buttons on the front of garments.
Makes it easier to mark, press and handle throughout construction

This coat was fully underlined in silk organza which enabled hand-stitched hems and catch-stiched hims to be hidden.
5. Use Wool Melton for Under-Collars on Bulky Garments
When you're sewing a coat or jacket with bulky wool, the collar is one place where a subtle fabric swap can elevate the whole garment. Instead of using your main fabric for both collar layers, use wool melton (or something lighter) for the underside.
Melton is a densely woven wool with a felted finish. It does not fray so no seam allowance is used on the undercollar, reducing bulk. It is stable, firm, and mouldable, making it ideal for shaping that classic collar roll.
Why it works:
Reduces seam bulk around the collar stand and neckline
Presses and curves beautifully into shape
Gives the collar a clean underside without distracting from the main fabric
Often used in high-end tailoring for durability and polish
Choose a melton in a matching or contrasting colour for a little secret detail just for you — or your lucky wearer.
Pro tip: Combine it with pad stitching and turn of cloth shaping for a collar that sits just right and stands the test of time.

For the under collar, a traditional wool melton was used - it gives the collar weight and body, rather than using another layer of the bulky green wool
6. Worsted Wools: For Advanced Sewists Only
Worsted wools — think wool gabardine — are tightly woven, smooth and crisp. They’re beautiful to wear but unforgiving to sew.
They show every stitch, press mark and pin hole, so precision is key. These fabrics are best left to experienced sewists who are confident with their handling, shaping and finishing techniques.
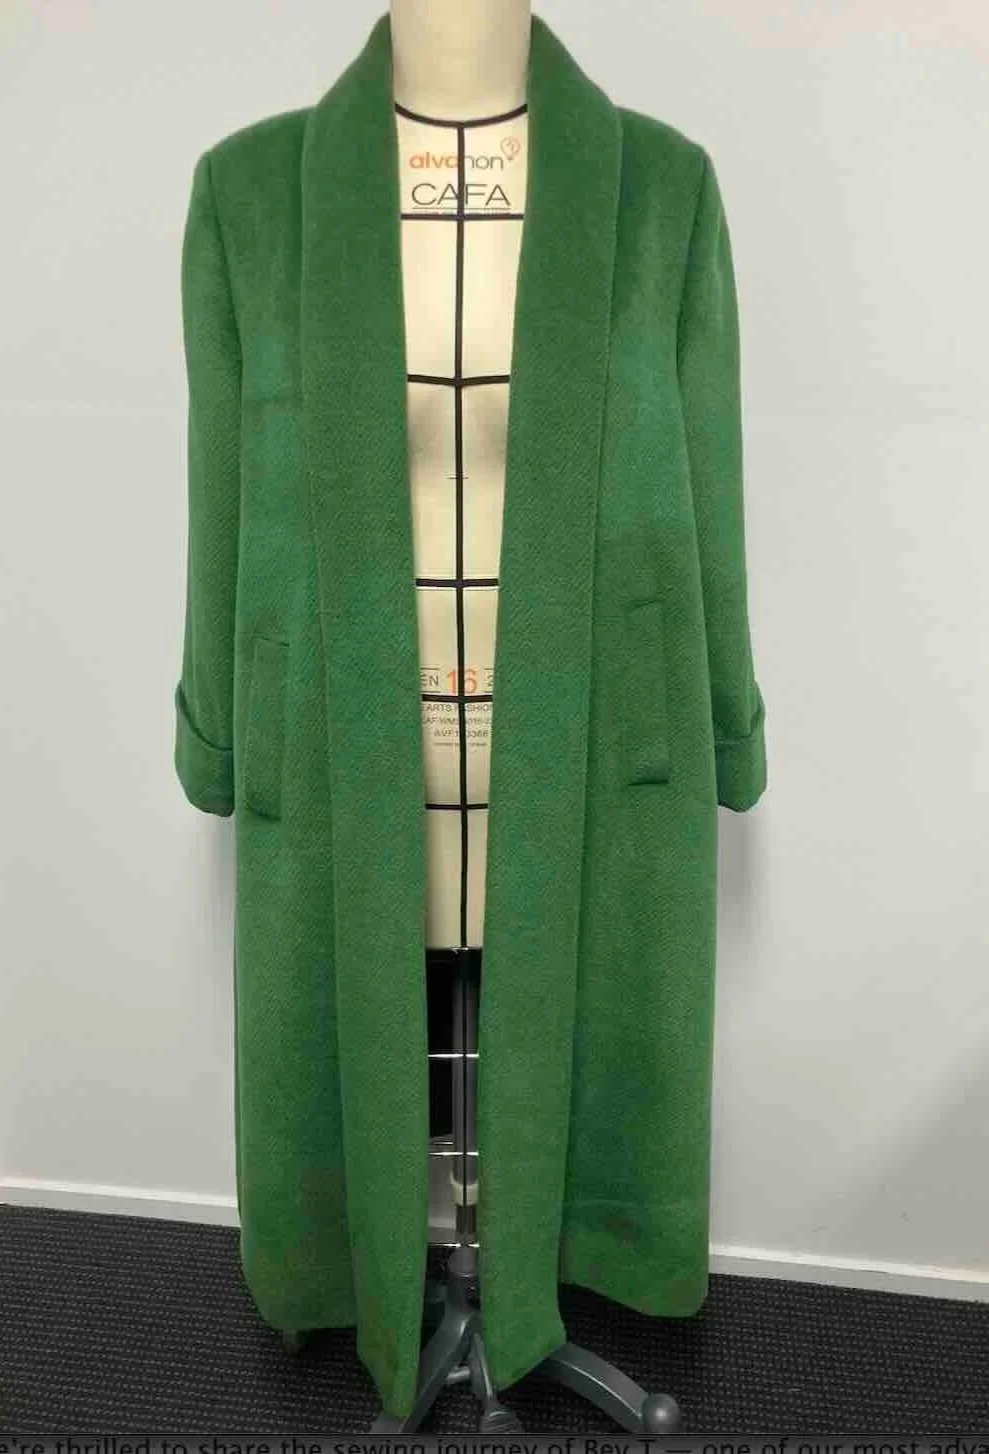
Tailoring a vintage green wool coat
Tailoring A Vintage Green Wool Coat
There’s something special about sewing with beautiful fabric — especially when it’s a luxury piece saved for the perfect project. This green wool coat was just that — and finished just in time for winter. This gorgeous green wool and cashmere was purchased from The Fabric Store some years ago — one of the last pieces of Lisa Ho fabric they sold.
A full length winter coat made from a vintage pattern, using traditional tailoring techniques.

McCalls 9668
The timeless pattern is from the 1950s.

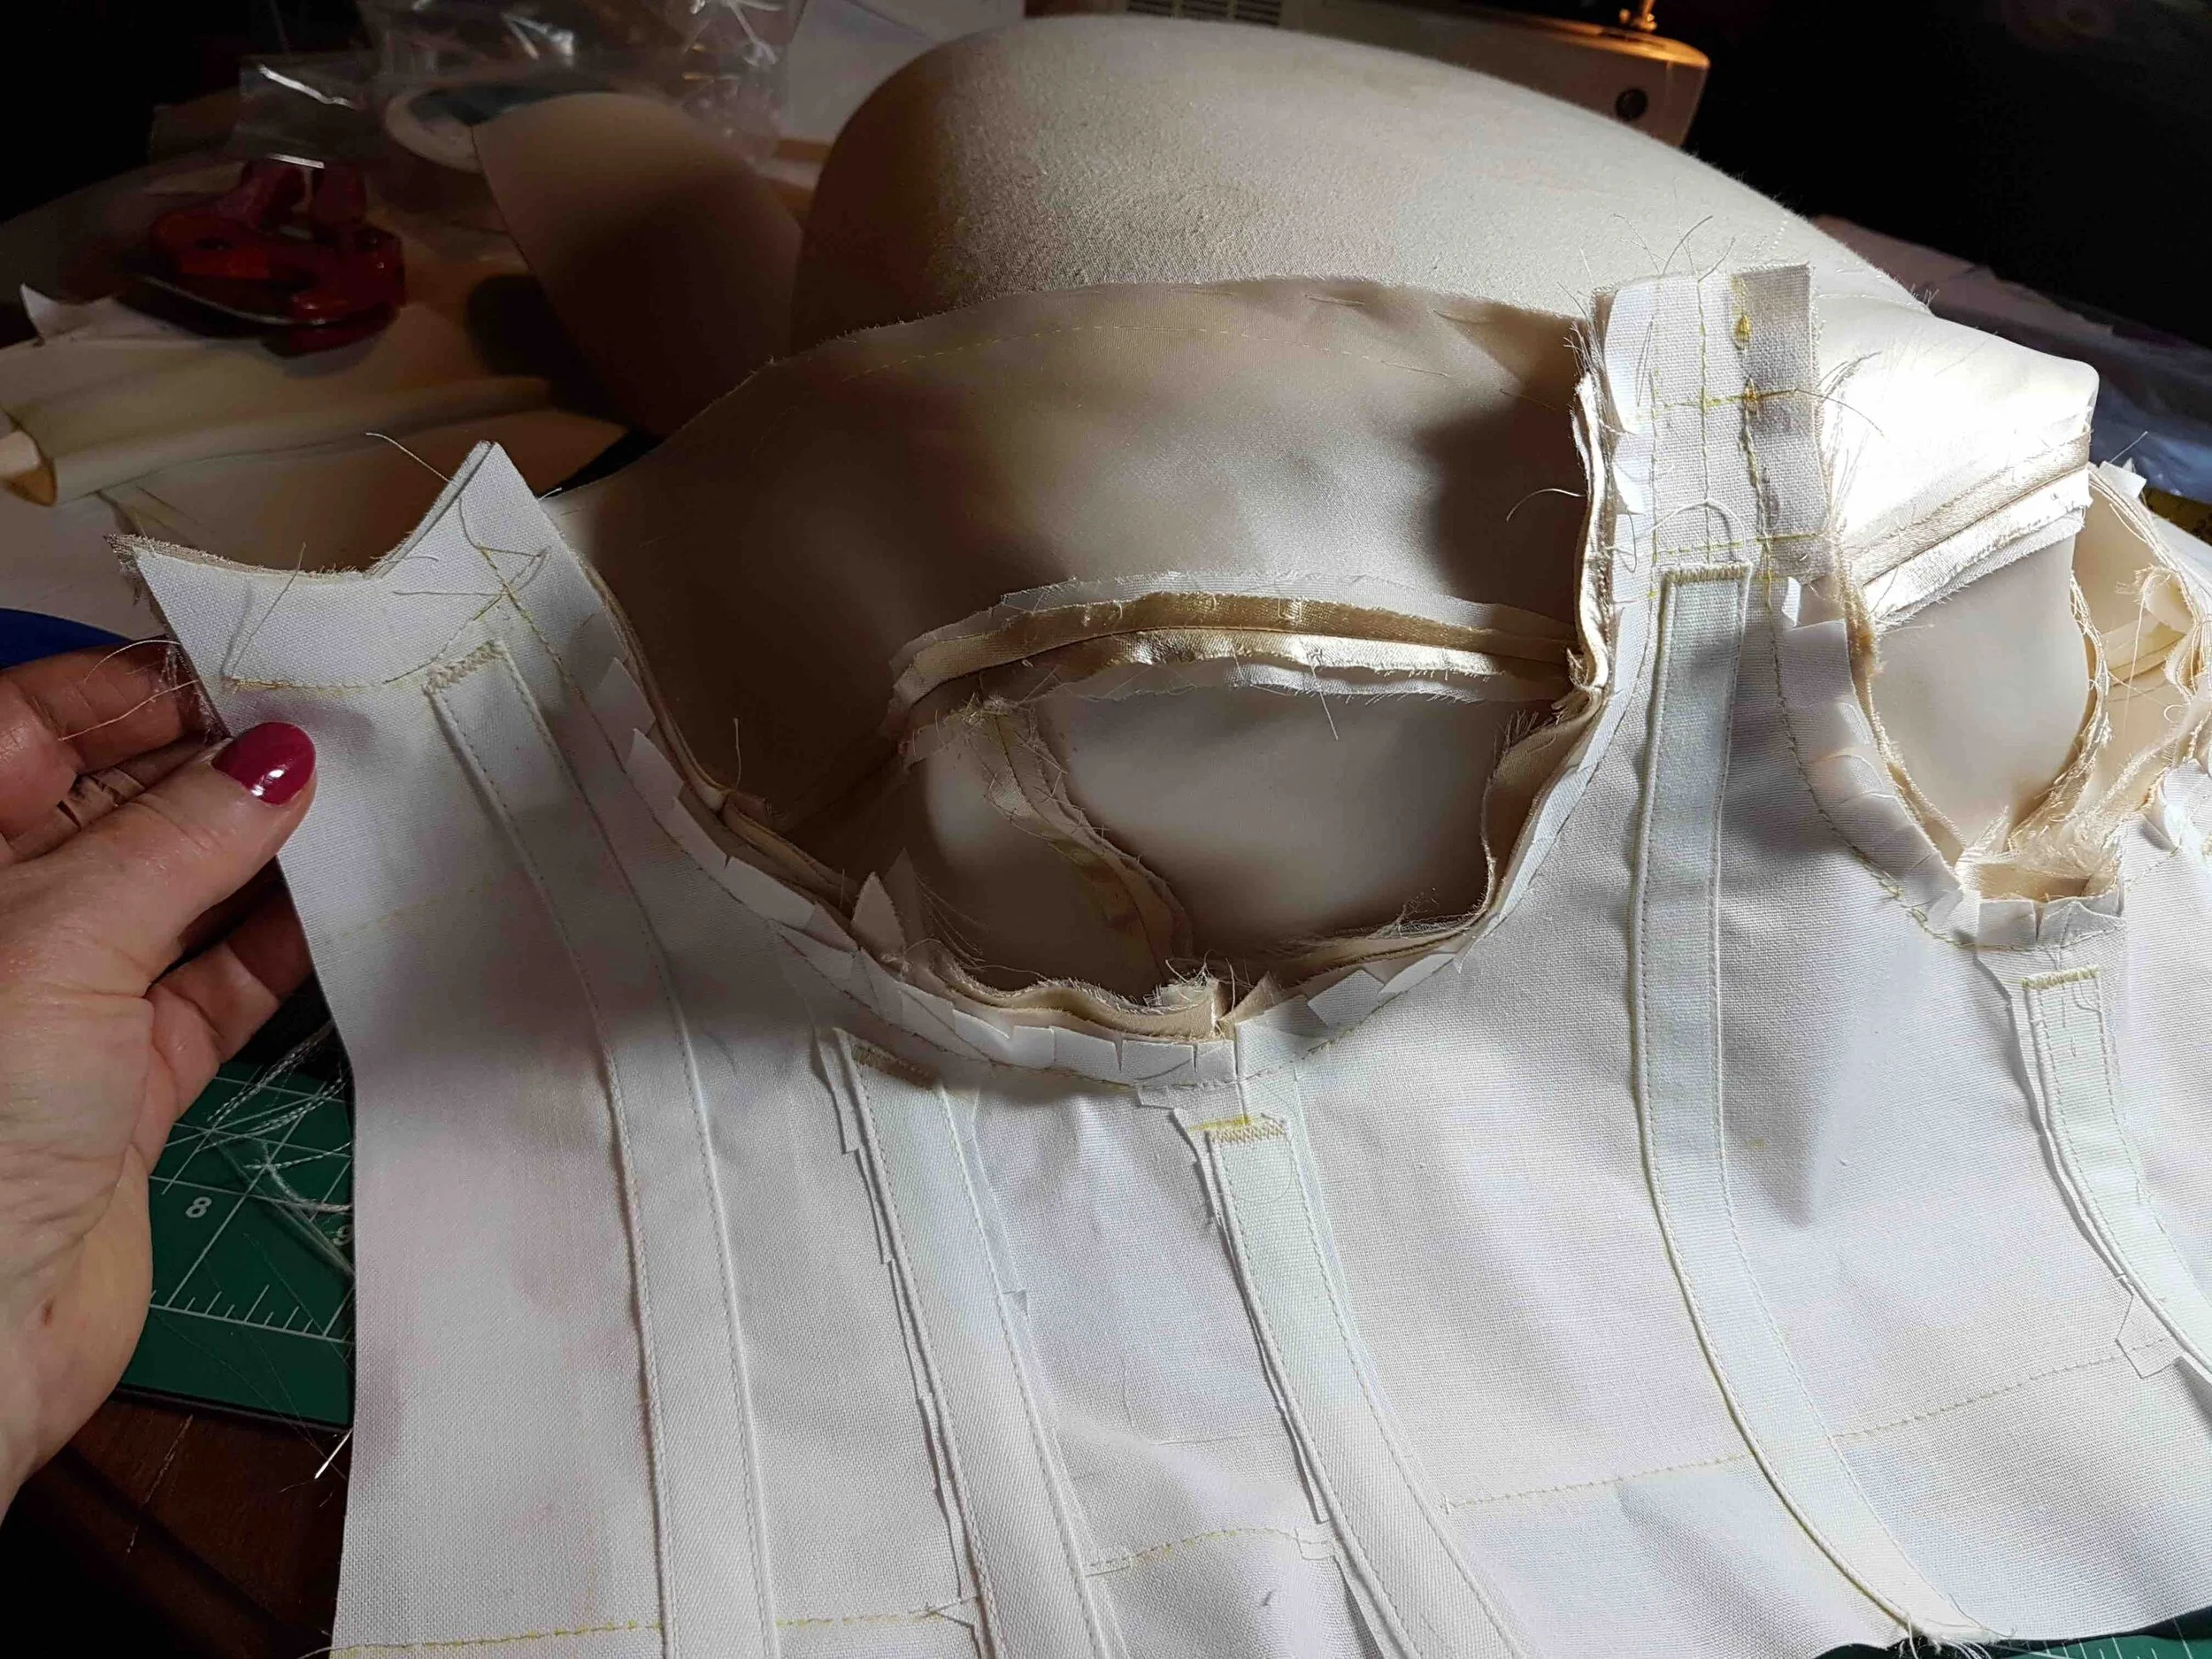
The coat is fully interlined with a mid-weight silk organza to provide structure to the garment without adding weight - the green wool is heavy enough on its own! All markings were thread-traced on the combined layers of fabric.

A half canvas - applied to the upper part of the garment - provided additional structure. A narrow strip of tape was applied along the edges of the coat opening to help them hold their shape.

Hand pad stitching was used on the collar to shape and stabilise the layers of fabric and tape applied to the collar roll line. You can also see the baseball stitching which holds the two edges of the dart underlining together.
For the under collar, a traditional wool melton was used - it gives the collar weight and body, rather than using another layer of the bulky green wool

A beautiful mid-weight Italian lining from Tessuti was chosen to work with the weight of the coat fabric. A lighter lining was used for the sleeves.

Born to Sew. Even if I Didn't Know It.
RYN
Couture sewing is all in the family
Ryn is one of our most advanced students and she’s amassed the most breathtaking fabric stash! We’re always excited to see what gorgeous textiles she’ll unveil for her next masterpiece. She sources fabrics from all over — including Minerva’s Bower in Katoomba and online, a favourite for natural fibres and a Friend of CAFA offering a student discount. And talk about keen — Ryn travels from the Blue Mountains to attend class every week!
CAFA: When did you start sewing?
Ryn: My mother emigrated from Greece after the war and, despite speaking no English, got her first job in a couture atelier. She trained there for five years and became a couture dressmaker for 60 years. She first taught me to overcast seams when I was 5 or 6, but I hated it and avoided sewing for decades. In my forties, I returned to it to make Disney dresses for my daughter. By then my mother was too unwell to teach me, but she had already passed on her reverence for beautifully made clothes.

CAFA: How would you rate your skill level when you started?
Ryn: Intermediate. I could use commercial patterns but struggled to get a good fit, and I felt some designs didn’t suit my proportions. I didn’t know how to adjust styles to make them work for me.
CAFA: What did you hope to learn when you started?
Ryn: Fitting and high-end ready-to-wear sewing techniques. My mother never compromised on fit and she instilled that standard in me.

CAFA: What inspired you start the Diploma?
Ryn: I wanted to build knowledge systematically and gain the skills to pattern-make and sew any garment I choose. It also lets me explore special projects and garments along the way.
CAFA: What have you learnt?
Ryn: I’ve learnt patience and the value of taking my time to achieve good results. Mistakes are part of the process — I can fix them and move on. Accuracy, preparation and basting make all the difference. It may take multiple toiles to achieve a beautiful fit. I’ve also learned to invest in good tools and equipment. Sewing has become my creative escape and future retirement hobby. I love meeting like-minded sewists and growing my stash of quality fabrics (often found at great prices from other students!).
Beginners Dressmaking | Student Spotlight
Hooria Goodarzi
INTRODUCTORY PATTERN MAKING & BEGINNERS DRESSMAKING
Hooria has been with CAFA for two terms, starting in our Introductory Pattern Making & Garment Construction course and then our Beginners Dressmaking class. Her skills have grown exponentially in this time and she’s made a beautiful dress and a skirt — both of which she loves to wear. We chatted with her about her sewing journey, starting with her first impressions that maybe her skills weren’t at the right level to start classes.
Spoiler alert: of course they were :) Everyone is welcome at CAFA and the rapid progress that students make is so rewarding.

CAFA: How did you learn to sew?
H: I started sewing in high school making an apron and a circle skirt. I loved it so much that I even toyed with the idea of becoming a fashion designer. But life had other plans — I ended up completing a degree in pure mathematics and now work as a financial planner. Sewing remained my much-loved hobby, but I stuck to the basics — tote bags and curtains, anything with a straight line — until I discovered CAFA.

Cotton is a great choice for beginners because it’s easy to handle, holds its shape well and sews smoothly without slipping or stretching.
CAFA: What inspired you to start sewing lessons?
H: I’ve always loved visiting fabric stores and imagining the designs I could create, but I struggled to fit or finish garments. After my second daughter, I attempted a breastfeeding-friendly top but got stuck on buttonholes — it’s still in my sewing box. Frustrated, I searched for classes that would fit with my busy life and could teach me the why and how of pattern making and sewing, which YouTube couldn’t deliver. That’s when I found CAFA.
CAFA: What were your expectations about starting sewing classes?
H: It’s been a turning point in my life. I was waitlisted for two terms before a Saturday opening came up* at CAFA and I've been attending for the past two terms. I really look forward to Saturdays and the mental space, the class gives me. I can focus and have a break from my children. I'm taking a break next term to consolidate my skills, but I'll be back! The flexibility of the course makes it easy to pause and pick up where I left off

Learning to sew from commercial (purchased) patterns requires you to understand the techniques they use. Our friends at Tessuti are a popular choice for patterns as their instructions are very detailed and include photographs.
CAFA: How would you rate your skill level when you joined CAFA?
H: I had a basic understanding of patterns but was I was a beginner. I wondered whether I was good enough for CAFA classes but found that everyone was welcome — regardless of their skills — and the teachers are all patient and experienced. I hope my story will encourage others like me to give it a try.
CAFA: What did you hope to learn when you started?
H: I see pattern making as a science, not just a life skill. I want to understand not only how patterns are made but why techniques are used. My goal is to improve my sewing finishes, master technical skills, understand commercial patterns and replicate my favourite garments
A test garment (or toile) eliminates guesswork for both beginners and advanced sewists.
CAFA: How has your time with us improved your sewing & pattern making skills?
H: I’ve learned to read and understand commercial patterns, use notches and markings, and apply techniques with confidence. Pins and tacking are now my best friends, and I’ve discovered the importance of measuring for accuracy. When I take my time, the final garment is wearable! I also have a much better eye for fabric when shopping. Next, I want to work on fitting and adjustments — I’m still sewing loose-fitting clothes but would love to progress to fitted garments like suits and jackets for work.
CAFA: How have you applied the skills you’ve learnt – what projects have you completed?
H: So much!
Pattern making and sewing a skirt block
Replicating a favourite top with butterfly sleeves
Using a commercial pattern to make a dress
Couture sewing techniques for dressmaking
Handling difficult to sew light weight polyester fabric

A Vintage Vibe & Classic Tailoring | Student Spotlight
〰️ Mid-Term Enrolments are Welcome 〰️
〰️ Mid-Term Enrolments are Welcome 〰️
Emma Dorreen
ADVANCED SEWING & TAILORING
You might recognise Emma from one of our favourite fabric stores in Sydney. Emma has been at CAFA for several terms and she has created many exquisite garments. Talented, creative and prolific are just three of the words we’d use to describe her. We invite you to step into Emma’s couture wardrobe as we chat about her life in sewing.

We love that so many of our students were confident enough to make their own wedding dresses. Emma’s is a beautiful nod to 90s minimalism. At her admission, the roses hide a bodice with misplaced bust darts. The dress is a mash-up of two patterns—a simple A-line with a back pleat for fullness—in silk duchess satin with pearl trim. I was happiest with the 3-metre silk organza shawl, finished with box pleats using hem fusing
CAFA: How did you learn to sew?
ED: I began sewing at ten with my mum, and my first garment was a vest. Sewing quickly became my refuge, offering comfort and creativity as I escaped the challenges and taunts of school life. When I was young, sewing was essential to afford clothes. I took a break while raising my family, but now that they’ve grown, it has become an obsessive pleasure. I even work at a fabric store to fuel my passion.

Emma made this exquisite dress with a tulip skirt from a vintage Christian Lacroix Vogue pattern from the mid 80s — now a rare and expensive collectable.

Emma sewed it from a cheap curtain fabric (though you’d never guess it). Alas, it’s the only pattern she’s ever thrown away…
CAFA: How would you rate your skill level when you started at CAFA and what did you want to learn?
ED: I was an advanced sewist, but I wanted to learn pattern making to create garments, alter commercial patterns and to improve my finishing and design skills. My goal was to design for myself, drawing inspiration from favourite garments and designers, while exploring and learning as much as I possibly could.

This linen top was inspired by a favorite garment. It is made using a combination of flat pattern making and draping.
CAFA: Some of your most memorable garments have been made from vintage patterns ..
ED: I have some special classic vintage patterns in my stash, and I’ve really wanted to understand how to modify them for a modern fit that works for me.
Emma made this timeless dress from a vintage Guy Laroche pattern in a beautiful black and white silk.
CAFA: How has your time with us improved your sewing & pattern making skills?
ED: The game changer for me was learning to use the sew line instead of the seam allowance edge— it has transformed the way I sew. I've learned both flat and draped pattern making to create jackets, skirts and pants and to replicate features such as collars. I've remade favourite garments and designed new ones inspired by blurry internet photos.

Note the beautiful pattern matching on this long jacket made from an exotic tweed fabric. It has bound buttonholes, patch pockets and a machine canvas inside.
ED: I'm also able to tailor jackets and coats using both canvas and fusible interfacings. Along the way, I've picked up tricks and tips that make sewing easier and more professional. Now that I’ve started, I can’t stop as there’s so much more to learn.
This stunning corded lace jacket was made by draping the jacket in calico and then molding the lace motifs to create invisible seams and darts. It is an evening wear technique that is also part of the Diploma program.
CAFA: What are the areas you now have skills in?
Flat pattern making
Draping
Couture sewing
Tailoring
Lace applique
Replicating favourite garments
CAFA: What are the garments you’ve sewn with us?
Eveningwear
Dresses
Skirts
Pants
Blouses & shirts
French Jacket
Jacket
Coat
Fashion Design | Student Spotlight
〰️ ENROL NOW FOR TERM 1 〰️
〰️ ENROL NOW FOR TERM 1 〰️
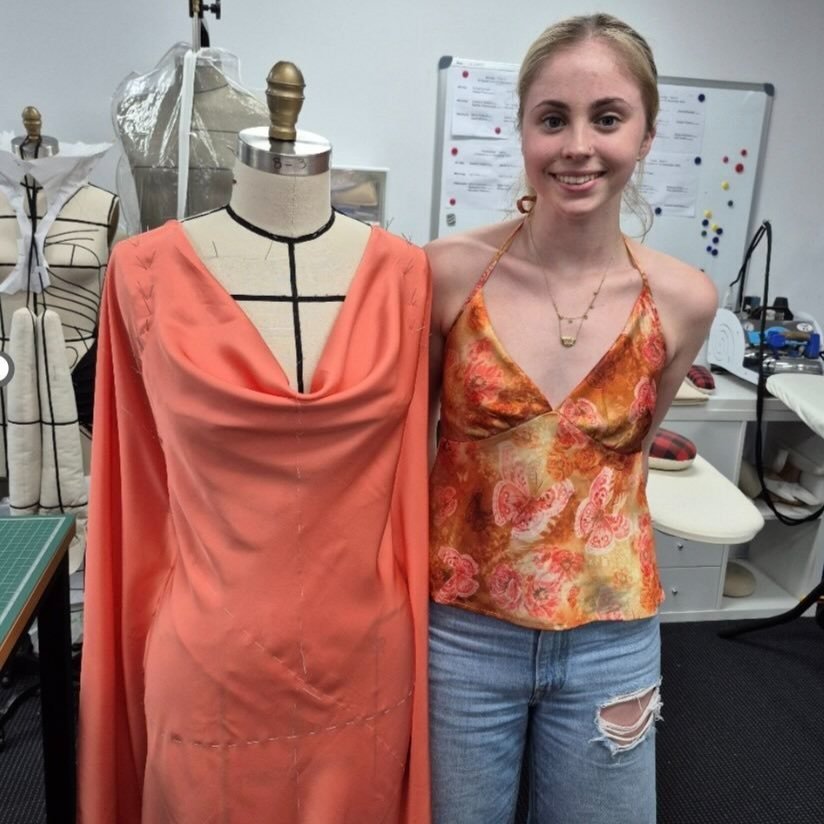
MACKENZIE FOGG
FASHION DESIGN STUDENT
Mackenzie joined CAFA as an HSC Textiles & Design student in our mentoring program. She’s always known that she wanted a career in fashion and she’s set her sights on launching her own label. We’re super-excited to share her journey (so far) and we know there’s a LOT more to come for Mackenzie.

This basic bias cut fabric drape is part of Module 5, Draped Pattern Making in the Diploma course. Note the thread guidelines tacked into the fabric to ensure true bias is maintained.
CAFA: How did you learn to sew?
MF: I started in Year 10 with the Duke of Edinburgh Award. I needed a supervisor and found a teacher who’d made wedding dresses — I sewed with her for two years. She’s retired now and I still visit her every Tuesday for a catch up.

Mackenzie’s HSC major work. Not only was this beautiful detached train and bow designed by Mackenzie, the photography and photo composition is also her work.
CAFA: When did you become interested in fashion as a career?
MF: I started drawing dresses in pre-school — I've never wanted to do anything else! I studied Textiles and Design in Years 10, 11 and 12 and did the HSC Mentoring program with CAFA. My Major Work was a four-piece wedding pants suit with a detachable train and reversible bodice. I wanted to create a set of garments that could continue to be worn as an eveningwear capsule after the wedding day. I received a Band 6 and my work was shown in the Texstyle HSC exhibition.

The HSC Texstyle exhibition display of Mackenzie’s work.
CAFA: What are you studying now?
MF: I’m working on two separate qualifications — a Diploma of Fashion Design & Garment Production at CAFA as a part time student and a Bachelor of Business (Fashion & Global Brand Management) at ICMS as a full-time student. I’ll finish the degree in August this year and will then study full-time to complete my Diploma at CAFA.

This top is reversible, black on one side and ivory on the other. It is part of Mackenzie’s passion for versatile capsule wardrobes.
CAFA: Why did you decide to enrol in two courses?
MF: I started at CAFA as the Diploma is a good fit with my main career interests — in practical, hands-on design and construction. My family has a small business background and I’d planned to do a business course after I finished my Diploma to help me establish my own business. I received a scholarship from ICMS and as CAFA has flexible course attendance, I realised I could do both at the same time.

This classic bow tie blouse - a sample made from donated fabric - with a set in sleeve is part of the Module 1 and Module 2 Pattern Making program. The secret is to use a matt fabric so the bow stays done up and of course there is a trick to tying a perfect bow.
CAFA: How have you managed to attend both courses?
MF: I study three days a week at uni and two days at CAFA per week (more during my uni holidays). I do my uni assignments on the weekends and sometimes work in the family business. The CAFA Diploma lets me work at my own pace with no set homework. This way I can finish my education sooner.

This was an experiment for Mackenzie’s mother. Two second-hand coats were joined together - time-consuming, but it’s s a great result.
CAFA: What have you learned from the CAFA course?
MF: Pattern making and garment construction knowledge, couture finishing techniques and proper garment fit. I love draped pattern making as I can see my creations unfolding. I've also learnt about design and colour, how to design for different body types and how to alter existing garments for a better fit. I want well sewn finishes for my collections!

A beautiful cowl neck top that is covered in both in flat and draped pattern making Modules in the diploma.

Tools of the trade.
CAFA: Have you had any internships?
MF: My first internship was with the ICONIC. Interestingly, it started in Fashion Planning & Buying, but I ended up with the design team because of my fitting knowledge from my CAFA Diploma studies.
I’m currently doing an internship with DIOR in Visual Merchandising for stores and events and I’m really enjoying it. I’ve been able to put into practice the design and colour theory from my Diploma.

Mackenzie wearing one of her favorite designers. Watch this space!
CAFA: What do you want to do in your career in fashion?
MF. I want to establish a brand producing quality clothing. My main interest is in eveningwear, but I'm frustrated by the lack or quality, choice and consistency in other areas. I like capsule dressing and would also like to produce more casual dresses that can be amped up for eveningwear. My ethos is about owning fewer, higher quality garments.
CAFA: We wish you all the best with your career - but somehow, we don’t think you’ll need it : )
Advanced Sewing | Student Spotlight
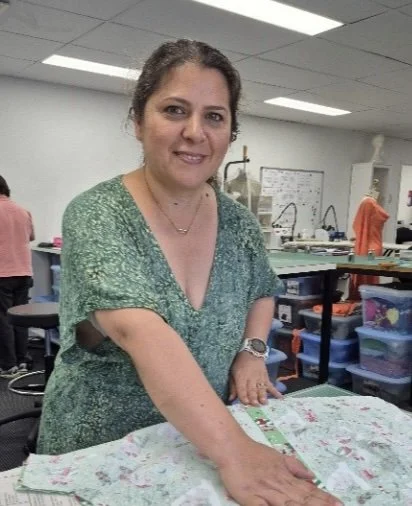
Beverley Thirkell
ADVANCED SEWING PROJECTS
We’re thrilled to share the sewing journey of Bev Thirkell — one of our most advanced and prolific students at CAFA. She’s produced so many stunning and polished garments that she finds a joy to wear.

Bev’s pink structured silk pique mother-of-the-bride dress.
CAFA: How did you learn to sew?
BT: My grandmother — Alice — worked as a seamstress for Sir Neville and Georgina Bowman-Shaw of Toddington Manor* in Bedfordshire, UK. When I was about 9 or 10, she taught me to sew on her Singer treadle sewing machine and my first project was an apron.

Even advanced sewists can improve their pattern making and sewing techniques.
CAFA: How would you rate your skill level when you started with us?
BT: Although I was an advanced sewist, I lacked the finishing techniques for truly polished garments. My wedding dress — made during the Princess Diana era — gained a rose for every mistake I made. It ended up looking like a decorated cake. Definitely room for improvement!

This cotton sateen dress with fabric designed by a textile artist was created by draping on the dress form. There wasn’t enough of this beautiful fabric to match patterns at centre front but look at the beautiful harmony created by the the placement of the pattern pieces.
CAFA: What did you hope to learn when you started?
BT: I wanted to design my own garments and learn pattern making from scratch. Commercial patterns didn’t always suit my style and after a couple of broken bones and the changes that came with middle age, they often needed adjustments to fit comfortably.

The beautiful drape of this skirt is enhanced by self godets which create the flared tulip shape. While most of Bev’s wardrobe is made from natural fibres, this polyester skirt has it’s place - it’s easy care and it can be dressed up or down with shoes and accessories to make it perfect for casual or work wear.
CAFA: Have you padded a dress form to your personal measurements?
BT: Yes! It’s brilliant as it evolves with my mature shape.

A classic, bespoke woollen coat that will last a lifetime. Seen here on Bev’s custom padded dress form, this classic style has been proportioned to her figure. The buttons provide creativity and individuality (the second button is concealed on the inside of the garment).
CAFA: How has your time with CAFA improved your skills?
BT: Most of all, accuracy, accuracy and accuracy! It makes a huge difference to everything from ease of sewing, finish and fit.
I’ve learnt to how to fit garments to my body — especially my shoulder area where I’ve broken bones — and now understand where and why standard sizing didn’t work for me.

These trousers are a lovey addition to a casual wardrobe. The striped pair are made from polyester fabric from Spotlight.
BT: Using the same fitting principles, I’ve made a bespoke jacket for my husband and dresses for my daughter. I’ve also learnt many couture sewing techniques that take my garments up a notch in terms of quality and appearance.
I really enjoy draping a pattern on my dress form and prefer it to flat pattern making. It’s more visual and I can be more creative and I can change the design as I go.

This Thai silk shirt was made from fabric donated to the studio. Note the beautiful pattern matching down the centre front and the careful overall placement of the fabric pattern.
BT: I now have the skills to successfully replicate my favourite garments and make adjustments to vintage patterns for a modern fit.
I’ve got a much better understanding of the tools I need for more polished results — hams, pressing aids, scissor types and sewing equipment — and have created a dedicated sewing space to use them.

Bev’s grandmother — Alice — in the wedding dress she likely made herself.
CAFA: What types of garments have you sewn with us?
BT: Pretty much everything! A mother-of-the-bride dress, eveningwear, dresses, skirts, pants, blouses and shirts, jackets (including a jeans jacket) and coats.
*Parts of Toddington Manor date back to 1562. My grandmother did all the invisible mending for the household (an art in itself), as well as making clothes for the family’s children.
CAFA: We have a range of specialised Advanced Sewing Classes (including Tailoring, French Jacket, Couture Sewing, Lace or Leather Skirts and Personalised Dress Form) as well as an Advanced Dressmaking Class for any garment made from a commercial pattern.
*Parts of Toddington Manor date back to 1562. My grandmother did all the invisible mending for the household (an art in itself), as well as making clothes for the family’s children.
8 Things I wish I Knew About Learning to Sew
LEARNING TO SEW
What I Wish I Knew Before I Started to Sew

I've love to tell that you can learn to sew in a day or whip up a designer dress in a weekend, but the reality is that sewing great garments that you will love to wear takes time, patience and whole lot of practice!
That said, there are lots of things I wish I'd known before I started my sewing journey!
1. Start Small and Master the Basics!
Before you dive into a big and ambitious project, you'll need to take the time to learn to use a sewing machine, master straight seams and have some understanding of fabrics. This will make your learning curve a lot more manageable. For that reason, we recommend that complete newbies start with our Make a Tote Bag course.

2. Invest in the Best Quality Tools You Can Afford
Cheap needles, pins and scissors are frustrating to use. Investing in quality tools early on (and only buying what you really need) will make your sewing more rewarding. We can point you in the right direction on what to buy.

3. Not All Fabrics Are Beginner-Friendly
Slippery, stretchy, or thick fabrics (like this gorgeous teal wool) can be a nightmare for beginners. Stick to cotton or other easy-to-handle fabrics when starting.

4. You Don’t Need an Expensive Sewing Machine
A simple, reliable machine can take you a long way when you’re starting out. Most of the features on high-end machines aren’t necessary for beginners. Ask around - maybe there’s someone in your extended family/friendship group who has a machine they’re not using. Second-hand are certainly not second-best. Look around : )
5. Patterns Can Look Confusing at First!
Sewing patterns have their own language and the instructions can appear tricky. Before you rush, take the time to understand symbols and terms explained on your pattern. If you want to start out with a commercial (bought) pattern, our Dressmaking for Beginners class is perfect for you!

6. Mistakes Are Part of the Process
It’s normal to make errors—don’t be discouraged! Every mistake is a learning opportunity. Seam rippers will become your best friend.
7. Fitting Clothes Takes Time and Practice
Making clothes that fit you perfectly is an art that comes with experience. Lots of it! Don’t expect your first garment to be flawless. If a great fit is your top priority, I’d recommend our Pattern Making & Garment Construction course.

8. Join a Sewing Community
Of course we’d love you to join our classes, but there are other options too: podcasts, Youtube, TikTok, IRL sewing groups … they key is connecting with other people who have different experiences. It can be a huge help when you get stuck or need encouragement.
Happy Sewing
Gaylene
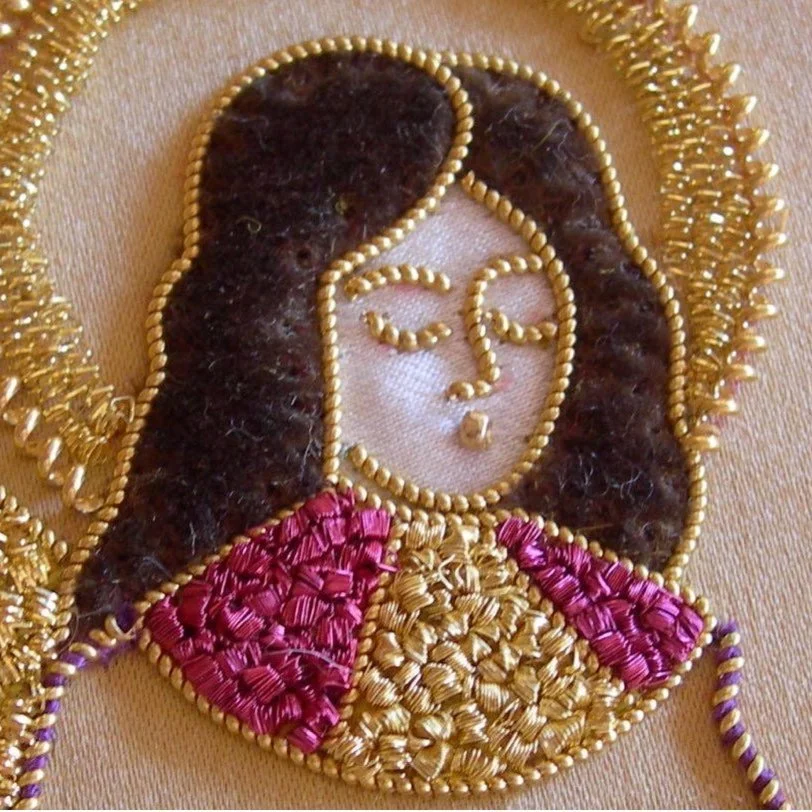
An Embroidery & Beading Treasure!
An Embroidery Treasure!
The Mastery of Mary Brown
Embroidery, Beading and Goldwork Expert

In a world of mass production and digital hacks, true craftsmanship feels like a hidden treasure. In the field of couture embroidery, Mary Brown's name shines bright as a gifted artisan and we're thrilled to have her as part of our teaching team.

Mary's Creative Credentials
Initially a secondary school visual arts teacher, Mary specialised in drawing, oil and acrylic painting, relief painting, etching and screen printing. With her interest turning to textile art, she graduated from the prestigious Royal School of Needlework at Hampton Court Palace in the UK in 2001. Mary is an accredited tutor and judge at the Embroiderers' Guild of NSW and in 2007 published a book: Goldwork Embroidery: Designs and Projects.

Every piece created by Mary is a reflection of her mastery. Her work is both bold and intricate, powerful yet delicate. All of her pieces feel as if they have a story to tell, each stitch a testament to her commitment to excellence and creativity.

Embroidery and beading designs may be timeless, but it takes years of dedication to master the techniques. Mary has refined her artistry and skills through thousands of hours of hand stitching.
Whether it's the delicate handling of silk thread or the painstakingly precise placement of beads, her education and practice has grounded her in the highest standards of craftsmanship.

What truly makes Mary a treasure is her ability to innovate while respecting tradition, blending classic methods with modern creativity.

As an educator, she’s known not just for imparting skills but for nurturing creativity. Her workshops are a blend of technical mastery and artistic inspiration, offering students a chance to grow in both ability and confidence and to create pieces in their own style.

If you’d like to learn embroidery and beading skills, we offer a short Workshop suitable for beginners.
Do You Toile?
Mid-Term Enrolments Welcome 〰️
Mid-Term Enrolments Welcome 〰️
DO YOU TOILE?
A few months ago, a printer repairer who was visiting the studio remarked that many of my students were sewing rather odd looking garments – all in the same very plain fabric. Of course he was referring to toiles or muslins (as they’re called in North America). I smiled as I explained what was going on but also (inwardly) lamented that so much of the hard work and genius that takes place in the studio isn’t exactly Insta-worthy!
So what is a toile and just how do you pronounce it?
A toile is a French word (pronounced twarhl) is a prototype or fitting version of a garment that’s made up in an inexpensive fabric so that the design can be tested and perfected. The name comes from the fabric of the same name that was originally used in their construction – a translucent linen or cotton fabric. These days, most toiles are constructed using calico or muslin. If you’ve accumulated a swathe of gorgeous fabrics in your stash but you’re too afraid to cut into your treasures, read on.

Is a toile the same thing as a muslin?
This is where it gets a tad confusing – especially for Trans-Pacific sewers. While a toile or a muslin are both test garments, muslin can also refer to the fabric that’s used to make it (especially in North America). A toile or a muslin can be made up in calico or muslin. I know, a little pedantic, but good to clear it up in the beginning.
Do you always use calico or muslin for a toile?
There are a number of reasons why calico or muslin is the go-to fabric choice for toiles. It’s inexpensive, it’s often available in larger widths, but most importantly, it’s a stable, woven fabric. This means that design flaws that may otherwise by obscured or camouflaged by a drapey fabric will be clearly visible. A neutral calico is also a good contrast for fitting and construction markings and you can even write your own notes on the toile. If you’re making a garment in a more fluid fabric (for example silk charmeuse or jersey), you would choose something less-expensive that mimics the hand or drape of your fashion fabric - for example this peach polyester crepe.

Toiles aren’t just for fashion designers.
Even if you’re mostly sewing from commercial patterns, either the “Big 4” (Simplicity, McCalls, Vogue or Butterick) or the many, many indie pattern makers (including our friends PaperCut, Cashmerette and Tessuti), the quality of your finished garment will be vastly improved if you make a toile first. Iron out those fitting kinks before even thinking of taking your scissors to the good stuff. Don’t be too hard on commercial patterns. If you think about it, how could it be possible to reduce the human race down to a handful of standard sizes and shapes?
It’s all about the fit.
Commercial patterns generally work from “average” body types, utilising B-cup pattern blocks and they’re often quite roomy, allowing plenty of ease. One of their main shortcomings is that the patterns are not marked with balance lines – vertical lines that should be parallel to each other and horizontal lines that should be perpendicular to the floor. On a toile, these balance lines are visible from the outside of the test garment, making it very clear where fitting adjustments are needed.

A toile gives you the confidence to try new techniques
I’ve seen so many sewers in the studio who are reluctant to expand their skillset and stick to the basics – which is fine – however ... for me, the point of sewing is to make something beautiful and unique and the sense of reward in completing a garment that will last for years. If you’ve never tried a welt pocket (and simply omit them from your jackets) a toile is the perfect place to start. I’ve also lost count of the number of students with a full bust who routinely choose a pattern size (or two) bigger and wonder why their finished garment resembles a shapeless sack. A toile will enable you to trial a number of techniques to achieve a perfect fit.
If you’re creating a new design, the pattern needs to be tested.
Essentially, a toile takes a 2D flat pattern and transforms it into a 3D garment to fit the body. One of the most important aspects of the process is to test and perfect sewing and finishing techniques and then determine the right sewing order. There’s a reason why patterns specify each sewing step in a specific sequence and when you start to design your own garments, you’ll quickly start to appreciate this. Sewers often find that their finished garment evolves in a different direction to their initial concept sketches and making a toile facilitates this. Even if you’re working from a tried and tested pattern block, new designs and details will emerge and a toile will show you what this will look like on a finished garment.

Keep notes and photos.
When your toile is coming together and you’re in the zone, there’s a tendency to assume that you’ll remember all of the steps in the process, not to mention all of the markings that you’ve made. My advice is to keep detailed notes for each toile and to supplement these with photographs (or visual notes – especially for the more complicated or intricate finishes or steps. Almost all of us have a smart phone at arm’s length, so there’s really no excuse not to do this!
Do you need your own dress form or dressmaker’s dummy?
If you don’t have someone who can help you with fitting (and it’s debatable how much “help” an ambivalent partner with pins really offers), a dress form is invaluable. Especially for fitting the back of a pattern. Dress forms also suffer from many of issues of commercial patterns (standardised, average body types), but some of them are adjustable or you may be lucky enough to conform to “fit model” measurements. Alas, this is really rare … from my experience, about 1 person in every 80-100. We currently have only one student in all of our classes who’s a fit model and we try really hard to conceal our envy : ) We also run a specialised class where you can make your own dress form to your personalised measurements.
Doesn’t it just add to the cost?
Sure. It absolutely does add to the overall cost of a garment, but in my experience, this is balanced out by the cost of throwaways, UFOs (unfinished objects) or mis-cuts … the sad failures we mournfully stash in the depths of our sewing rooms. There’s also the thrifty option of using old curtains or sheets – op shops are a good source for these. Who knows what else you might find – be sure to rummage for vintage patterns and buttons as well.
Is it worth the extra time?
You don’t have to make a complete toile for every garment you make (sometimes a quick result is what you’re after), but It’s such a great way to elevate your skills and turn “home-made” into “couture”. As a teacher, there’s nothing more satisfying to see an excited student complete the last stitch of a garment, try it on for a final time and say: “this is the best thing I’ve ever made”.
Say yes to the toile!
What is Haute Couture?
What exactly is haute couture? And what can we learn from it?
Mid-Term Enrolments Welcome 〰️
Mid-Term Enrolments Welcome 〰️
Haute Couture
What is it? What can we learn from it?

When I was searching for a name for my business: Couture Arts Fashion Academy, I knew wanted something that captured the originality of the famous French haute couture houses. But most of all, I wanted to teach aspiring sewists about the importance of fit and attention to detail.
Haute couture literally means high sewing or high dressmaking. It refers to clothes that are made to fit an individual, using the finest of fabrics and sewn with precise and time-consuming techniques.
The term, haute couture, is regulated by law in France. Surprisingly, it is the English-born designer, Charles Worth who is widely credited as the father of haute couture. He opened his Paris atelier in 1858 and made many changes to the way clothes were designed, made and sold.

Fashion is a major industry in France and their legal framework is designed to preserve their standing as the fashion arts capital of the world. The Chambre de commerce et d’industrie de Paris (CCIP or Paris chamber of commerce) appoints the Chambre syndicale de la haute couture who annually reviews membership of the organisation and determine who will show at Paris Fashion Week. Members are divided into a hierarchy: official members are the French houses such as Chanel and Dior, correspondent members include foreign fashion houses such as Armani and Valentino and guest members that include new upcoming talent as well as designers of jewellery and accessories.

Haute couture houses design made-to-order clothes that require more than one fitting and they must operate an atelier or workshop that employs at least fifty full-time staff, including twenty technical workers. Every January and July, each haute couture house must present a collection of no less than 50 original designs — including day and evening.
Because of the design time involved in a one-off garment — including hand work, fitting procedures and the fabrics used — haute couture designs are very expensive and very few people can afford them. In fact there are only 4,000 haute couture customers in the world. The Fashion Law have crunched the numbers on haute couture and it makes for a fascinating read.

So where does that leave that rest of us who can’t access hand-made, one-of-a-kind garments? Many of the elements of haute couture can be emulated by professional designers and home sewists. Couture principles are embedded in everything we teach at CAFA — starting with our beginner’s classes. Even if you’re making the simplest of A-line skirts, there are fitting and sewing techniques that can elevate your garment from home-made to fabulous.
Happy sewing.
Gaylene
New Shorter Classes for Busy People - Term 2 2023
With everyone trying to get as much as they can out of their time, we’re offering new classes starting from Term 2, 17 April to 2 July, 2023.
For those new to CAFA, we offer flexible attendance options for all our studio classes. with half day (3.5 hours) and full day (7 hours) options available. We also have slightly shorter full day classes on Thursday (5 hours) and Friday (6 hours).
For the first time in Term 2 2023, we’re offering a shorter class of 2.5 hours on Thursday mornings, Thursday afternoons and Friday mornings. These classes are perfect if you need to start later in the day, have limited time, or you just want to try a single class before committing to longer term study.
A term of 11 weeks will cost $670 and is the ideal introduction if you want to improve your sewing and pattern making skills.
Wishing you Happy Easter holiday from all of us at CAFA - hope there’s time for a little creativity too : )
CAFA
Red Carpet Oscars | Who Wore What and Why?
Who inspired Marilyn Monroe’s signature bombshell look?
What did Jane Fonda wear to protest the Vietnam War?
Why was Halle Berry’s 2001 dress pitch perfect for her Oscar win?

Joshua Ranftl Photography
CAFA's friend and guest teacher, Dijanna Mulhearn, has launched a new book! Red Carpet Oscars presents over ninety years of fashion worn at the event since its inception in 1929, charting what the stars wore and why.

Joshua Ranftl Photography
From homemade and pre-loved dresses to ready-to-wear and haute couture, it tracks the style evolution of Hollywood's leading stars, the commercialisation of the red carpet and the radical shifts that reshaped formal dressing.

Naturally, we're immensely proud of Dijanna and can't recommend her new book highly enough. Fingers crossed, we will be lucky enough to offer her Personal Styling Workshop again soon.
Read the New York Times review of Red Carpet Oscars here.
Then head to your favourite bookshop to pick up your very own copy.
Congratulations Dijanna!
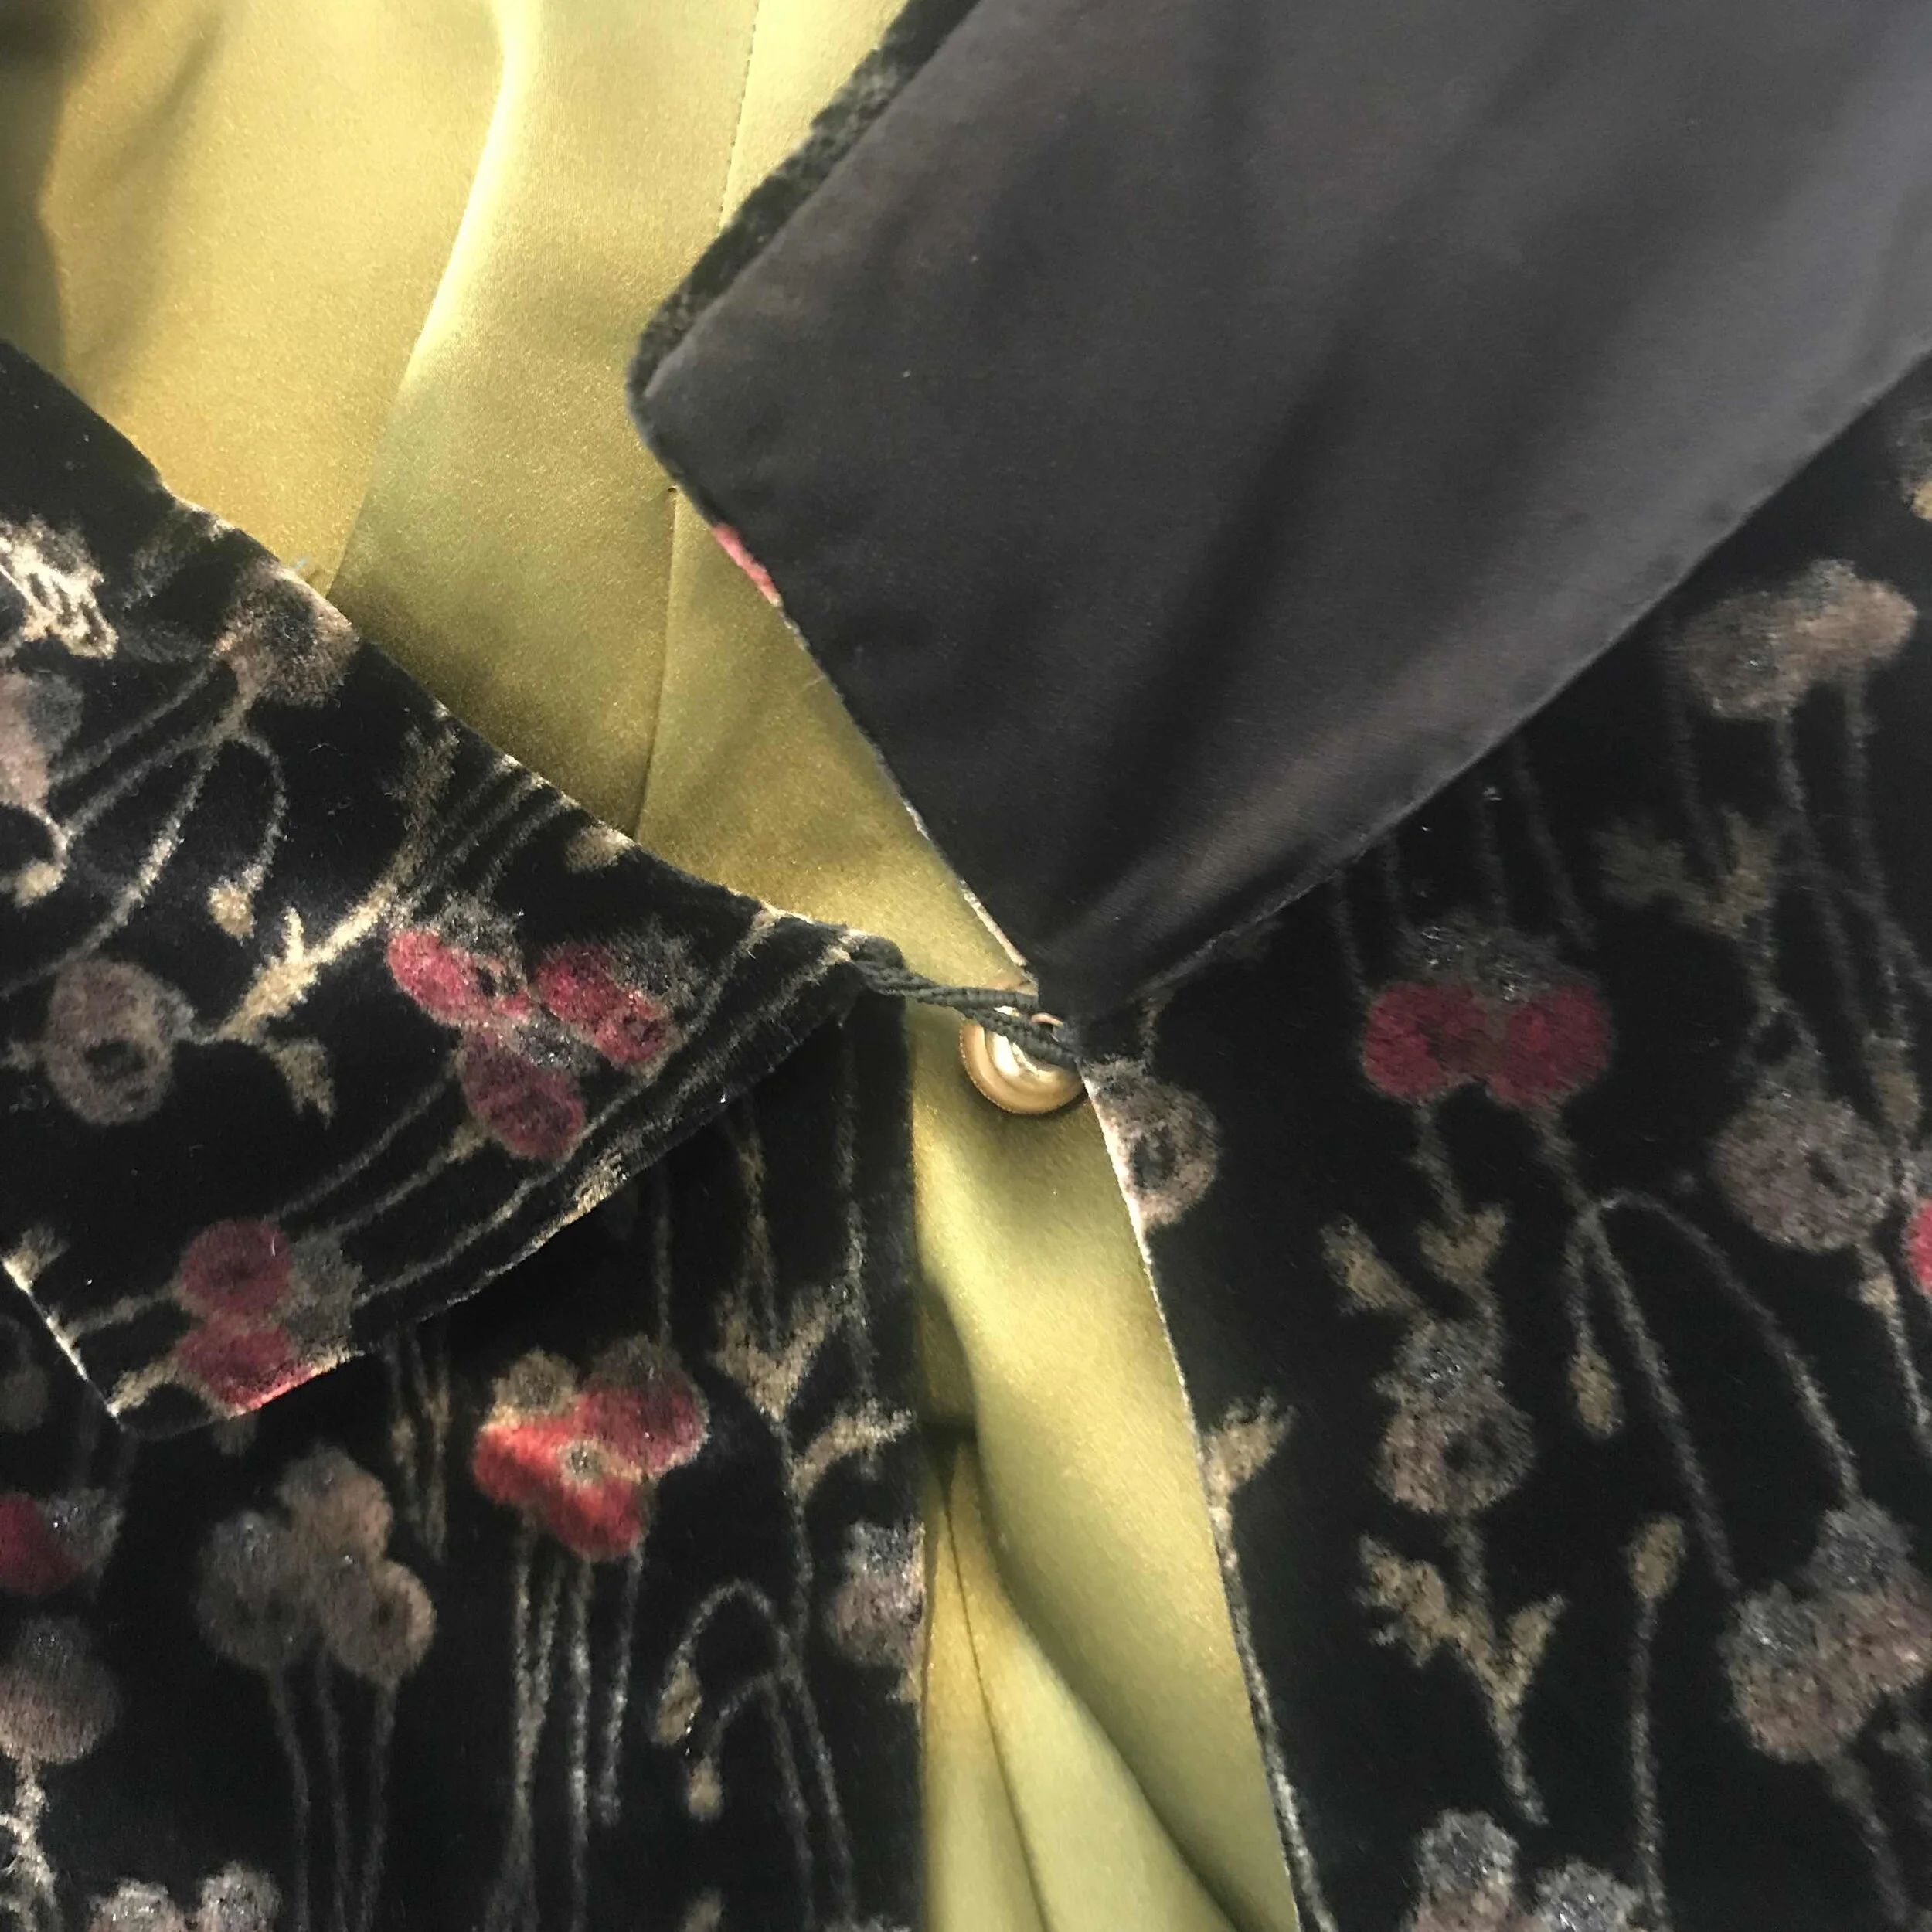
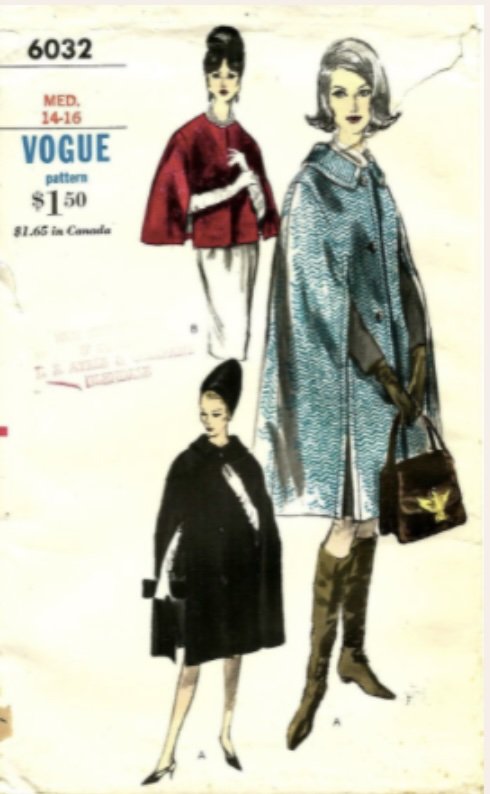
Sewing With Velvet | Part 2
For all those up for a challenge, with the right techniques, you can sew velvet and create a stunning garment you'll treasure for years to come! Yes, it's a bit tricky, but it's so worth the effort. Here's what one of our students made using the amazing Vintage Vogue pattern 6032. Note the VERY simple design - this is an important consideration when working with velvet.
Basting or Tacking
When you put two layers of velvet with their right sides together and try to sew them, you'll quickly find that the fabric has a tendency to move - a lot! This “creeping" occurs because the piles of the fabric slip against each other. There are various ways to help alleviate creeping, including pinning vertically, basting using a diagonal stitch, holding the fabric taut as you sew, stitching with tissue paper between the layers or using a walking foot on your sewing machine. For this cape, the student did lots of hand basting using a diagonal stitch to secure each seam.

Test … and then test some more …
Before you actually sew, it's important to use scraps of your velvet to do some test seams first. Choose a machine needle size according to the weight of your fabric and loosen your tension a notch ( to allow for the additional bulk of the velvet pile). The selection of a slightly longer stitch length may also be needed to help alleviate tension issues. Lowering the presser foot pressure is another good idea, to reduce the risk of the feed dogs damaging the fabric. Luckily, we have quite a few different machines in the studio and we tested all of them to find the best results.
A velvet board in action
Pressing
It's well worth taking the time and care in the preparatory stage, as you don’t want to be unpicking any seams (velvet is a rather unforgiving fabric once it's damaged). Also, it's best not to use fusible interfacing with velvet, as pressing the interface to fuse it will crush the velvet pile. Pressing velvet directly with an iron should also be avoided. Instead, gently finger press seams open, then apply steam to the wrong side of the fabric (a towel on the ironing board underneath the garment piece you are steaming will help support the delicate velvet pile). Better still, use a velvet board. We have one in the studio, though unless you sew a lot of velvet, it's a rather expensive item to own.
How to finish seams and hems? As you don’t want to add bulk, seams may be left raw-edged (providing the fabric doesn’t fray) or trimmed with pinking shears. If a finish is required, edges could be overlocked or finished with Hong Kong seams using a lightweight tulle. This cape was underlined, so there's no visible hem stitching, the actual roll line of the hem was also machine stitched and the underside of the collar was made using a thinner silk fabric (but still enough substance to provide structure).

As you run your hand over your luscious velvet garment, you will be so pleased you made the effort - especially with the details … vintage buttons and handmade button-loops!
Couture Showcase | 2021 Highlights
The quality and originality of the garments that have come out of the studio so far this year has been outstanding. It’s truly inspirational to reflect on how talented our students are. Here’s a sample of what they’ve been working on.


Draping is a real art form. This is an advanced technique, but definitely a skill worth learning. Students start by learning Pattern Making & Garment Construction techniques before advancing to Draping.

Just in time for winter, a beautifully-sewn woollen cape made from a commercial pattern

There are always oohs and aahs in the studio when someone breaks into their vintage stash. This one’s a real stunner and we can’t wait to see what it becomes. Maybe something made from a vintage pattern?

A beautiful example of fashion illustration. It makes me want to turn it into an actual garment!

Lingerie is not a beginner’s project, but if you start with a basic pattern drafting course, you can work your way up to this.
A well-fitted tailored jacket with beautiful welt pockets

This beautiful lace blouse is deceptively simple. The work involved in the fitting stage pays off. If you’re interested in learning to sew lace, we offer a skirt-making class.

Wow! The colours, the design and the fit … just wow.

Sewing With Velvet
Velvet might seem like an ambitious fabric to choose for a garment, but armed with the right techniques, it’s well worth the effort to make something special from this truly luscious fabric.
SEWING WITH VELVET
With its lustrous sheen and soft pile, velvet is the epitome of luxury. However, it does come with the (not entirely undeserved) reputation of being tricky to sew.
The name “velvet” applies to fabrics woven in a particular way, regardless of the composition of the fabric. In a process dating back to the Middle Ages, velvet fabric is comprised of a woven base which holds the pile. Originally made from pure silk, velvet is now predominantly made from polyester, rayon, silk and various blends. There are quite a few types of velvets including crushed, stretch, embossed (a pattern is stamped into the pile) and devore, where the pile is cut away to reveal a pattern.

There are two other fabrics which are similar to velvet - velveteen and velour. The main difference between the three is the length of the pile. Velveteen has a very short pile, velour is intermediate and velvet is the longest. Velveteen is heavier than velvet and has less shine and drape, whilst velour is stretchier than velvet. Many of the sewing techniques used for velvet can be applied to the two other fabrics.
When sewing velvet, it is of the utmost importance that you carefully select a suitable pattern and fabric for your chosen project. Gathers and soft folds emphasise velvet’s excellent draping qualities, but design details such as top stitching and darts should be avoided, as the fabric pile can be damaged.

The pile of velvet fabric has a definite direction, called the “nap”. You can feel the direction of the nap by running your hand down the fabric. It is usual to make velvet garments with the nap running downwards, so it’s essential to make sure all fabric pieces are cut in the same direction. Pattern pieces also need to be laid out on the wrong side of the fabric and in a single layer, as the pile on the right side make it difficult to pin and cut. Tailor’s racks are the best way to mark dots and other pattern points, preferably made using silk thread.
The most challenging part of making a velvet garment is sewing the fabric pieces together. There are lots of techniques to cover, so we’ll leave that for another post …
If you’re keen to try your hand at sewing velvet, we teach this in our Couture Sewing Techniques class.
Make Your Own Jeans? We Did.
First and foremost, jeans are just pants. Denim pants, yes, but still an achievable sewing project for intermediate sewers.

Secreted away in the CAFA studio last Sunday - one of the very few days in the year when we're not running classes or workshops - a small group of us tested a new Eureka Pants pattern. We were intrigued by the option of three back choices for each size - to accommodate a variety of derrieres and crotch depths - and were hopeful of landing a winner to recommend in our classes. More specifically, we wanted to test this pattern to make jeans. Spoiler alert: we were not disappointed with the terrific results. If you're keen to make jeans or pants, you could tackle these in our intermediate dressmaking class.
I was joined by two teachers and two experienced students who volunteered to fit-test the pattern. We range in age from 20s to 50s and represent a good mix of sizes and shapes. Here's what we collectively learnt.
If you have basic sewing skills, you could tackle a pair of custom-fit jeans or pants in our Intermediate Dressmaking Class. The Eureka Pants Pattern is available for students to purchase.
Jeans Are Just Pants.
The jeanious is all in the denim and the details. You CAN alter a well-drafted pants pattern and add pockets and top-stitching to match your fave jeans, but you have to get the fit right first. At the risk of sharing TMI, the critical part of your jeans pattern is the crotch. This is the starting point for fitting. Rather than making too many adjustments here, it's way better to hoik the whole garment up to fit your crotch and then to alter the waistline. And speaking of waistlines, if you always wear long tops, shirts or tunics with your jeans, don't get too hung up about low-rise or high-rise waists, just pick what's comfortable for you.
Make Peace With Your Body.
If you start by accepting and embracing the body you have - not the one you used to have or hope to have - it makes the fitting process a whole lot easier. Focus on what flatters your body shape and makes you look (and feel) good.
Own Your Style. Fashion, Not So Much.
Remember the last time you found your dream jeans? The perfect fit. Great denim. Reasonably priced. Okay, scrap the last one we can all find a way to justify spending lots on the perfect jeans ... And then the unthinkable happens. They stop making them. Worse still, you hate all the alternatives. Here's something to think about. 3,600 people in Australia over the last year searched Google for "bootleg jeans" compared to 2,400 for "skinny jeans". There's no judgement here other than wear what you like - if you can find it. If you can't find jeans you love ... read on.
Great Jeans Start With Great Denim.
When you're shopping for denim, it's hard to know what you're actually buying. A little stretch is a good thing - but too much stretch and you'll end up with saggy baggy jeans that you'll likely never wear. Ditto cheap denims that often warp and are off-grain. We used a navy-black mid-weight broken weave denim from Japan. The diagonal weave of the twill is reversed at every regular intervals to form an even design. This creates a flatter fabric that eliminates the leg twist effect. If you're interested in denim, check out Pacific Blue Denims' amazing denim dictionary.

Jeans Can Also Work For Work
When you have the option to choose how much contrasting top-stitching and detailing you want on your jeans, you can create a really versatile and stylish pair of jeans that you can wear to work. Especially now the office rules have relaxed a little.
The Wearable Toile.
The great thing about denim is that it's really sturdy. The multiple fit lines that you've machine-stitched onto your test garment - and I can't over-estimate the value of fit lines - are easy to remove without damaging your fabric. If you cut your seam allowances generously, you will almost always be able to wear your toile. In our test group of five, we all achieved this.
Measure and Fit Once. Make Them Again, and Again ...
Once you finesse your pattern and fit, transfer it to heavy-duty card with all of your key measurements. This will be your blueprint to make many, many more pairs of jeans - in fact, any kind of pants.
Sustainable Fashion
I'm sure you've seen recent media articles pointing out some uncomfortable truths about the fashion industry and its contribution to environmental problems. For example, some estimates indicate that around 60% of clothing bought in Australia is trashed within a year of purchase. That’s almost two out of three garments purchased. But you can take positive steps to change this.
Make your own clothes. A lot of clothing is thrown out because it doesn’t fit properly or is poor quality and falls apart. Sewing your own clothes means you can select more sustainable fabrics and make garments that fit well and will be more durable. CAFA offers a range of courses to suit all sewing skill levels and also a Personal Styling Workshop to help you choose styles you will love to wear. If you love it, you’ll wear it.

Recycle quality clothes. There are an increasing number of shops that sell vintage and quality second-hand clothing, as well as the tried and true charity and op shops. Pop back often as you generally have to put in a bit of work for that amazing find. Look for natural fabrics, tailored items and high quality details such as vintage buttons and beading. Have a look in your own wardrobe (or someone else’s) for interesting pieces just waiting for a new lease on life. You can use your sewing skills to alter a garment to fit, or use your fashion design skills to remodel it completely. If a garment you love is no longer wearable, consider pulling it apart and using it as a pattern for a new one.

Shop for sustainable fabrics. If you’re buying cheaply-produced fabric and are unsure of its origins, you may just be contributing to the problem. One of our favourite online fabric finds is maaidesign. and their Lady McElroy range of sustainable cotton lawns.
Let’s have a slow fashion movement. Instead of the quick adrenaline rush of buying something new, enjoy the planning and process of making it yourself, and take pride in the sense of achievement when your garment is finished. If you have an upcycled/recycled or vintage find, we’d love to see it!
The Art of Draping
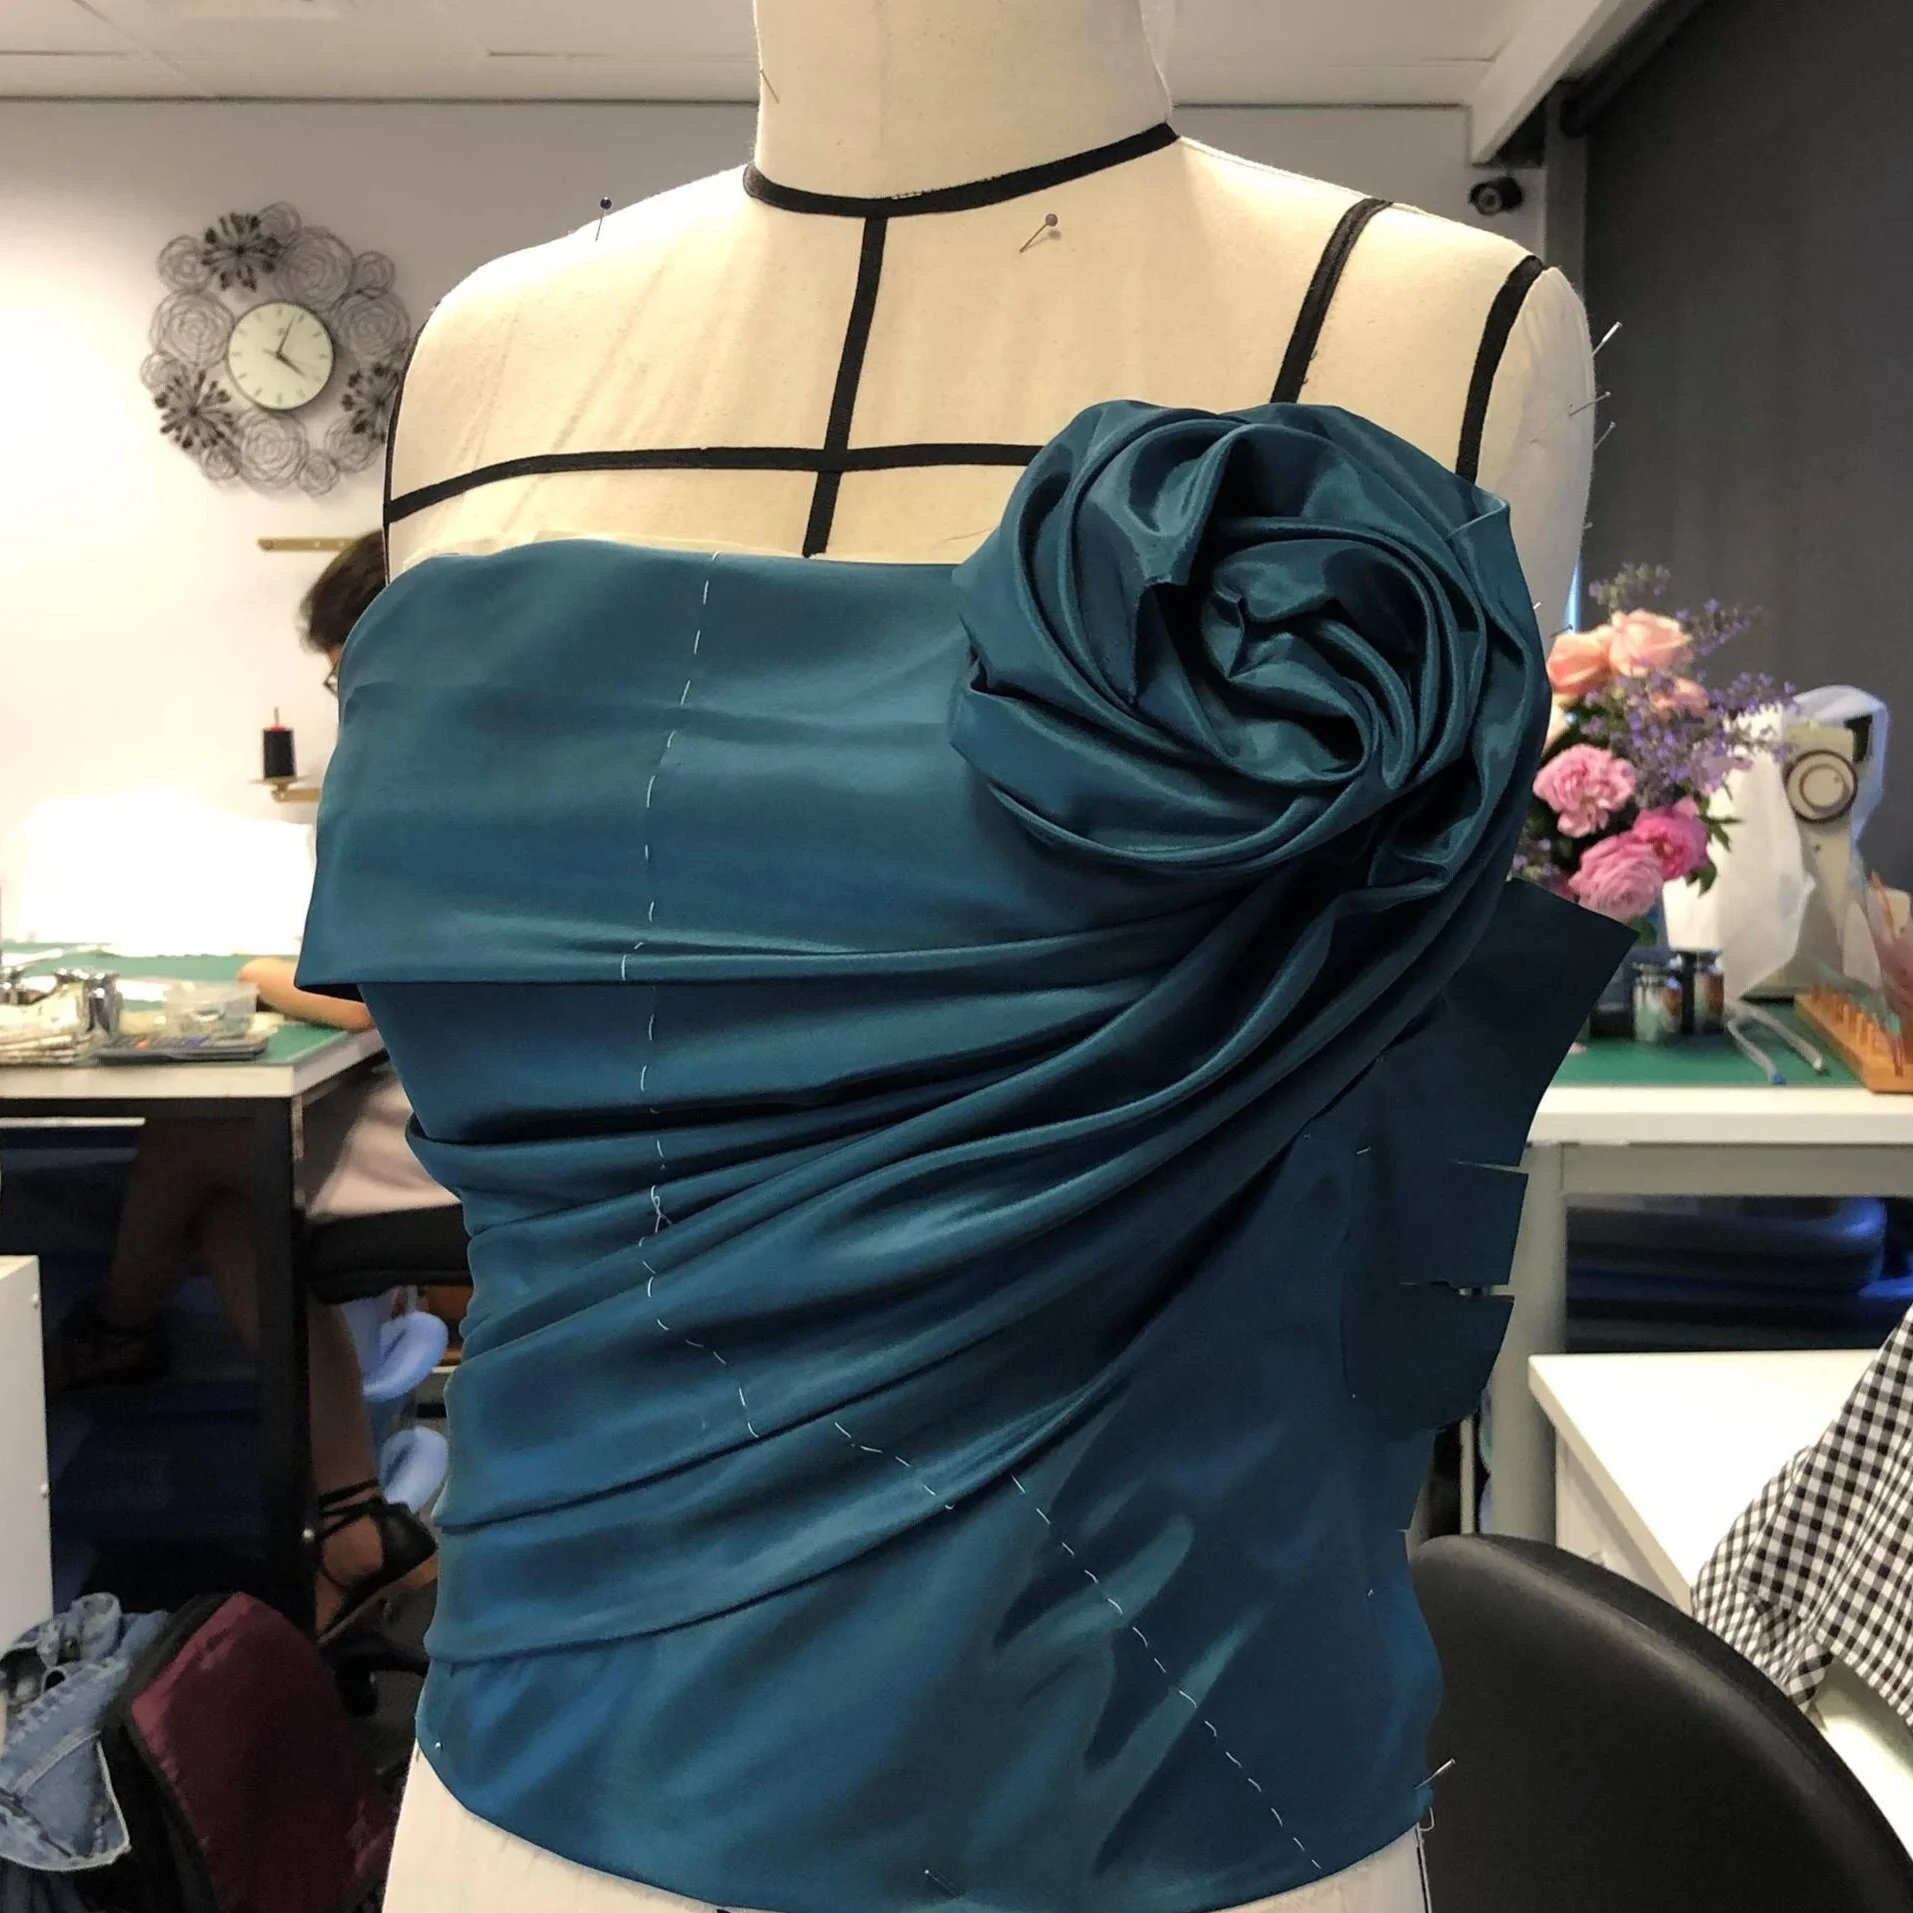
Draping (or as the French call it, moulage) is a technique used to create 3D patterns by manipulating and pinning fabric on a dress form (or dressmaker’s mannequin). It’s a technique that fashion designers use to explore the fusion of fabric, shape and fit. Many designers prefer draping to sketching as they can see how the fabric falls and be able to experiment with different silhouettes and textures as they work towards a final design.
Many prominent fashion designers are known for their signature draping expertise. Madeleine Vionnet pioneered draping on the bias grain at the beginning of the 20 century at a time when women were embracing less restrictive clothing. Her concept designs often started with a half scale dress form. Madame Gres (born Germaine Émilie Krebs) was another influential Parisian couturiére, prominent during 1930s and 40s and beyond. She famously used 30-70 yards of silk jersey to drape a single dress. During the 1950s, the Spaniard Christobal Balenciaga became known as the “King of Fashion” with his structural designs and famous one-seam Yoki coat. Notable 21st designers embracing draping are Elie Saab and Toni Maticevski.

Draping may be used to make any kind of pattern, but it’s most often employed for eveningwear using one of more of the following design elements:
Sunburst (or radiating). As the name suggests, upward facing pleats appear to radiate from a single origin point (not necessarily on the garment). The origin point may not be on the garment.
Gathering or ruching to create texture and visual interest and to highlight features (for example, to accentuate a bustline).
Bandage drape. This very fine, uneven ruching is sewn down layer by layer to hold it in place. The signature style of Herve Leger, this is the most time-consuming draping technique.
Cascade or cowl drape. The centre of the drape is on the bias and it sits in cascading pleats that always face upward. Sometimes the term cascade is also used to describe a vertical ruffle on a dress,
Twist and knots are often used to conceal seams and structures. A twist knot drape may also be used to join a conceal two separate pieces of fabric.
Draping with narrow widths. This technique originated in response to fabric shortages and the availability of silk fabrics in narrow widths.

If you’d like to learn Draping, we offer this an Advanced Pattern Making class. You will need to complete an Introductory Pattern Making class or have the equivalent experience.
Happy sewing.
Gaylene
CAFA 2026 TERM DATES
Term 1: 22 January - 7 April 2024
Term 2: 15 April - 30 June 2024
Term 3: 8 July - 22 September 2024
Term 4: 30 September - 15 December 2024